Garage

Sunday 22 September 2013

MIG Welder for the Workshop.... Finally!

I have had a MIG welder on my wish list for a long time. I can't justify buying one new since I am unsure how often I will use one. As anyone also following my blog knows, I really am not a fan of Chinese tools so that was a nail in the coffin as well.

I sold a dividing head and a rotary table a few weeks ago to a nice gent who mentioned he had some tools and equipment he was looking to get rid of. He mentioned some diamond cup wheels which would be perfect for my Thörns T2 tool and cutter grinder.

I stopped into his place today and walked away with this haul here:


I ended up with a heap of sandpaper, stainless grinding disks, 2 small 3 phase motors, 2 diamond grinding cups, a grinding wheel and a MIG welder. I bought more than I really needed but I couldn't pass up a Swedish made MIG welder:


It even came with the instruction books. I didn't buy the gas bottle since I will use gassless MIG welding wire. The diamond cup are really what I wanted and they will be ready to go when I have the grinder up and running:


So I'm a happy camper today. It's been a productive weekend!

Stay safe.

Sealing Gaps in Garage Doors for Winter

For those of us that use a car garage as a workshop, warmth is important over the winter months. Cold machines like to break, and cold oil does not like to lubricate things. I am also slow to start on cold days so I want a workshop that remains a little warm over winter without costing the earth.

I have insulated the garage already, but have had issues with closing gaps between the garage doors and the wall. This renders all the insulation redundant since the heat can just seep out. I had initially closed the gaps between the roller doors and garage with rubber strips. These were strips used under doors to block drafts. They worked OK but the problem has been they catch and then tear.

As you can see from the picture, I have a brush at the top to seal the gap, but the rubber has been catching in the door and causing it to stop. It has also damaged the rubber and torn big chunks out. The solution has been to install brushes instead. They don't catch, they stay flexible and are quite effective at sealing in the heat. I couldn't get the largest size as they only had 2 so I went with large brushes up top, and shorter on the bottom half:


It looks a little odd and I will probably change this later. On the other door the gap was smaller so I could use the smaller size which was fortunate as I only had 2 large brushes.


This is a cheap solution to sealing garage door gaps. If you try it, close the door before you install them and just push the brush up flush with the door. Don't force the brushes too hard against the door though as this will cause increased resistance which will cause the door to automatically stop. The brushes are flexible which means that when you fasten the first 2 screws, you can bend it to the shape of the garage door.

So there you have it, to seal gaps between garage doors and the door frame, you can use door brushes. Like Ned Stark said, "Winter is coming!"

Jungner VF600 Downfeed

I have been getting more time using the machines and was a little frustrated with the power downfeed on my Junger VF600 metal mill. When I bought it the machine was covered in gummed up oil and sawdust. This meant that many of the functions it had were tough to engage since knobs need to be turned or pushed in / out and the oil / sawdust was acting like glue. The downfeed is useful to get a consistent finish when using something like a boring head so I want it functioning as I have a couple projects that need some boring done.

The power downfeed required me disassembling the unit:


The unit comes out to reveal this:


This is a latch system to engage a cog which turns the downfeed screw. In the picture you can see a phenolic / tufnol button. This was in constant contact with a cam and was quite worn. I machined up a bronze button that will be in use until I can get some tufnol rod. The machining didn't take long since I was able to take 1.5mm at a time on the lathe:


There really is no substitute for rigidity and horsepower on a lathe. So now the machine is back together with the new button installed. I just have to get to the clutch on the unit to tighten it up and I am done. I'm saving that for another day as  just need to use the machine at the moment.

Wednesday 18 September 2013

The Horizontal Metal Bandsaw for the Hobby Machinist

I have a pretty decent collection of metal working machines now. I have a drill press,, metal mill, lathe, surface and tool grinder, belt grinder, bench grinder, drill bit grinder and a metal bandsaw. The metal bandsaw was the last machine I purchased and to be honest I don't know why I waited so long.

The truth about machining is that it is just a process of material removal. Anything that makes this process easier and allows you the ability of rapidly reducing the size of you material is a huge plus. Hacksaws and files do this in a manual fashion, the horizontal metal bandsaw, mill and lathe allow you to do this with higher speed while still maintaining precision.

The horizontal metal bandsaw opens up your options with regards to stock choice. For example you can cut an axle down and use the metal for your projects or just store the metal for a rainy day. You would not consider this if you had to cut the material by hand (believe me, I used to use a 6" grinder and a hacksaw). This is the reason why the Chinese / Taiwanese 4" x 6" metal bandsaw have skyrocketed in popularity. For the price these machines cost, I can't blame people for buying them - but I often wonder what the trade-off is in hours to get them to perform.

So what is it that you need to look for in a horizontal metal bandsaw for hobby use? I am no expert but this was my list:

  1. Useful capacity
  2. The ability to cut angles by moving the saw armature, not the stock
  3. Ability to use coolant
  4. A solid vice
  5. A powerful motor
  6. Rigidity
So why is capacity no. 1? Because the larger the capacity, the more options you have for cutting down stock that may be too big for others - increasing your selection of materials for low cost or no cost.

The ability to move the armature to cut angles means the saw can be placed against a wall with the stock clamped and there is no need to move the saw. Saws that require you to move the stock need to moved from walls as the stock bumps into them when cutting angles.

The option to use coolant means extra life for your saw blades. You may choose not to use it, but if you are doing repeated cuts in a hard material, this option will really shine through in the cut quality and life of the blade.

A solid vice is a must-have feature in my books. A quick action vice is an even bigger bonus but many cheaper machines do not have this feature. A solid vice allows you to grip awkward shaped objects tightly and prevents the stock from rolling in the jaws and damaging your blade. This especially necessary if you have course toothed blades and a strong motor.

The powerful motor means you can cut through tough materials without bogging the saw down. It also allows the machine to run cooler and therefore extends the life of the machine. I have seen many photos of smoking metal bandsaws because the motor was cheap garbage with overly-generous horsepower ratings. Unfortunately, if you buy Asian you are often rolling the dice as to wether the ratings are true.

I know many people don't care too much about rigidity in a saw but for me this was important. The larger the capacity of the saw, the more rigid you want it. Rigidity allows you tension the saw blade enough to keep it tracking straight. With flimsy saws, the more you tighten, the more you alter the shape of the frame, making a square cut difficult to achieve. Woodworkers are more used to this issue with wood bandsaws but metal bandsaws also suffer from tracking issues if the saw is not rigid. Many saws provide you with a means of adjusting the blade guides which goes some way in fixing tracking issues, but these are no substitute for adjustability AND rigidity.

So are horizontal metal bandsaws with auto down-feed worth it? The answer is yes, providing the makers don't compromise on the other features I mentioned. When you are using a metal bandsaw for hobby use, it is not often that you will need to cut pieces of metal at the saw's maximum capacity. For my saw, I can cut a 50mm metal bar in about a minute. I don't believe that the auto feature will save me enough time to make up for other features that I would prefer to have. The other problem I see with automating certain functions is that people don't pay due care and attention to what is going on since they assume the machine will function properly 100% of the time. If by chance the blade starts tracking incorrectly due to low blade tension, then before you know it you have cut a slot into your vice because you were not present.

If you do decide to buy a horizontal metal bandsaw, do yourself a favour and buy a decent bi-metal blade. The blades that come with most machines (except for expensive European or Western machines) are garbage. The difference between a cheap blade and a quality blade are night and day. If I bought an Asian machine, the very first thing I would do before running it is to throw the unused cheap blade in the rubbish and install a decent blade by a reputable name like Starrett or Lenox. You should also keep a small oil bottle handy with cutting oil. This will make your bandsaw blades live a longer, happier life. Good luck bandsawing!

Sunday 15 September 2013

Colchester Chipmaster Review

The review of this Colchester Chipmaster lathe took 49 years to write. My Chipmaster was made in 1964 and seems to be a bit of a rare machine. All the part numbers match and confirm that it is indeed a 64 model, and a metric Chipmaster from this year is a rare beast indeed. I figured that now I have used it for a few projects, I am qualified enough to write a review for anyone looking at a Chipmaster.
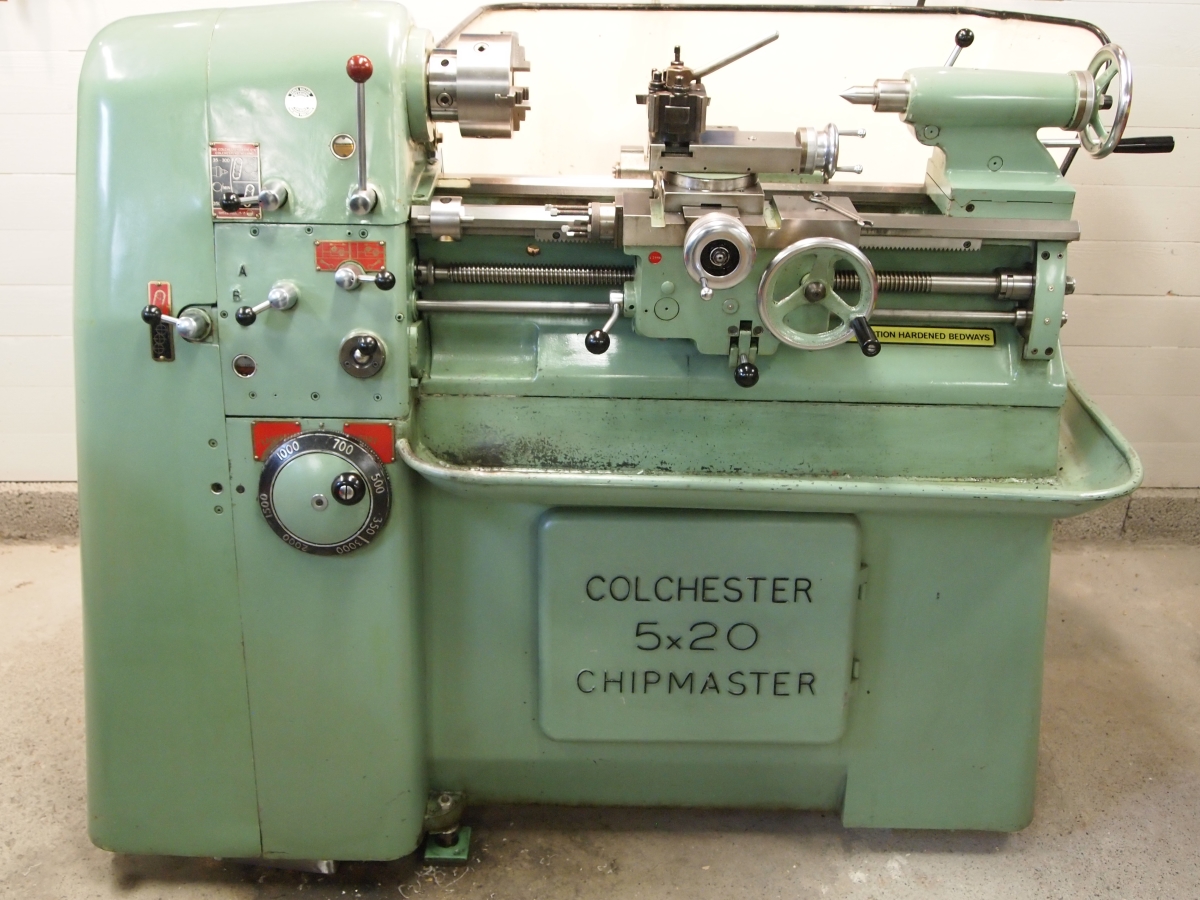
Here she is:


This is Colchester Chipmaster Continental, meaning it is metric. The specs are as follows:

Swing over bed: 5.75" (146 mm)
Distance between centres: 20" (508 mm)
Bore diameter: 1 5/16" (35mm)
Speed range: 35 - 3000 rpm
Weight: 550 kg
Power: 3 HP

Starting at the Tailstock
I guess the best way to review a machine is start at one end and move through to the other. I'll start with the tailstock and the very end.


As you can see, the tail stock is very heavily constructed. Mine has both metric and inch graduations. The dial is very large in diameter and is satin chrome finished like all the dials on the Colchester Chipmaster. There are 2 levers, one to lock the tailstock quill, the other to lock the tailstock to the bed.

As is evident from the picture above, the bed is very wide given the modest capacity of the lathe. It is very stable and the tailstock is no exception. The lathe features several lubrication points for the ways on the carriage, unfortunately there are none on the tail stock.

The Colchester Chipmaster Bed
An exceptional feature of the Colchester Chipmaster is it's bed. Extremely rigid and well thought out, it really is the crown jewel of the lathe. It features hardened ways and eleptical holes that allow the swarf to fall through to the rear of the machine.


This feature makes cleaning the machine a snap as there is even a hole directly below the chuck.


A quick brush pushes the swarf to the chute and to the back of the machine.

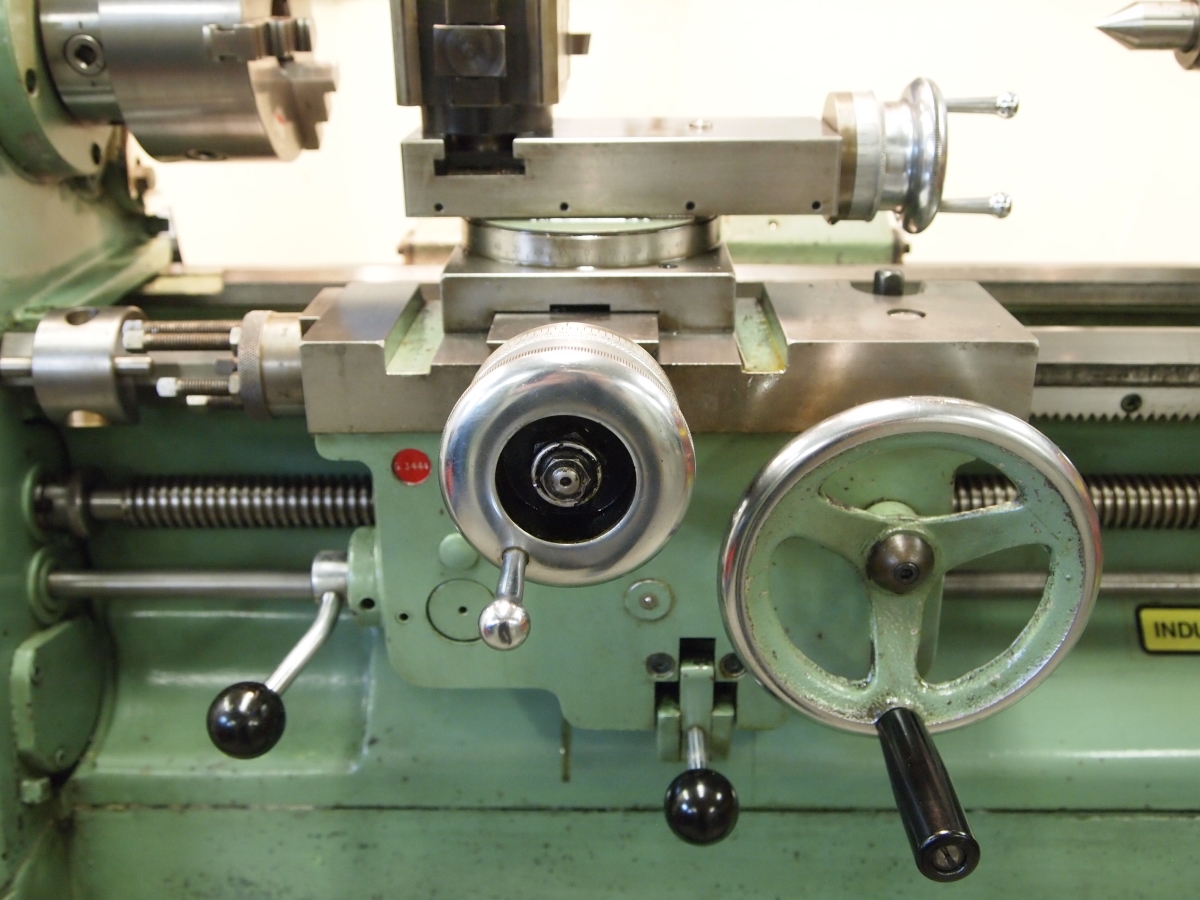
The Colchester Chipmaster Carriage and Apron
The carriage of the Chipmaster seems strange to many due to the carriage hand wheel location. On most lathes, this wheel is set up so that it is operated by the left hand. On the Chipmaster it is the opposite.


To be honest, I have found this to be quite convenient and have had no issue with it at all. Eagled eyed readers will notice that this machine does not have a thread dial indicator. The Chipmaster Continental does not have an indicator, and it is expected that you will use the machine's reverse to keep the leadscrew half nuts engaged when threading.

Between the two hand wheels on the apron is the feed shaft lever, used for longitudinal and cross feeding. To the left of that is the lever controlling the half nuts for the lead screw. The fact there is a lead screw and separate feed shaft makes this machine a lathe capable of heavy work while still saving precision for when it's needed.

The carriage is locked via a nut at the top of the carriage, located next to the carriage's oil bath filling hole.
A permanent lever would be ideal here however given the low clearance with the compound slide it would be hard to do right. I leave a spanner on it permanently. You can also see the oiling point for the ways. The cross feed and compound slide have generous dials and are extremely easy to read.

The longitudinal feed and cross feed are a combined unit located on the front of the apron. They are combined into a knob that is slid into position. The first notch in is for cross feed, 2 notches in is for longitudinal feed.

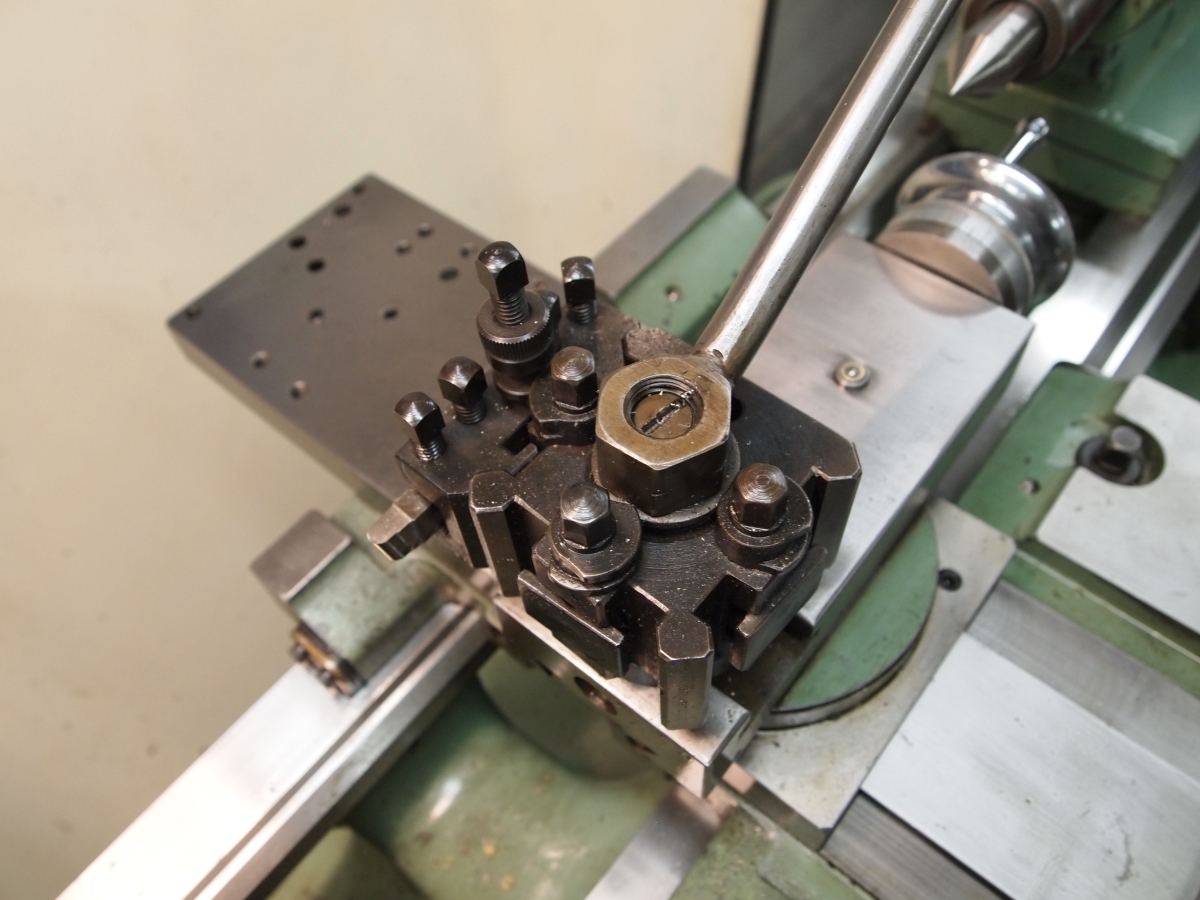
Atop the compound slide is the quick change tool post. On my machine I had the Dickson style. It is very decent quality and rigid. I have taken some deep cuts with it and have had not had any problems.


On many Colchester Chipmasters the way wipers are long past their due date. You can make Chipmaster way wipers easily by cutting 4mm neoprene or any other oil resistant rubber to size. I used a bandsaw and razor to cut mine. I made a template for them so I never have to measure again, just transfer the outline onto the rubber and cut away. You can see by the picture below that the fit is tight:


A useful extra is the carriage stop. This needs to be used with caution though as on occasions the carriage has pushed the stop and I have come close to crashing the machine. The standard stop has 6 different settings and is useful for work that is repetitious.


Colchester Chipmaster Headstock
There is not really a lot to be said about the headstock. It features Gamet precision tapered roller bearings and has a spindle size of 35mm - quite generous really.


The headstock is attached via 4 Allen head bolts. I initially thought this was flimsy but the finishes I have obtained from the machine have proven me wrong. The chuck is attached via a D1 - 3 cam lock. This ensures that the chuck stays on when you spool the machine up to 3000 rpm. Just check that all lugs are tight before testing it out or risk a 4 kg missile tear through the garage, your neighbour's house and the farmer's prize cow... 2 km away.

The headstock is where the beauty of the machine's design shines through. It's a terrible state that modern design has evolved into the monstrosity it is today. The 60's is where it was at. The art deco style of the machine make it as nice to look at as it is to use.


The headstock features 2 levers on the front. The lever on the right is the clutch lever, and the lever on the left is the belt / gear selector. The lever at the back is for the electrical box - right is forward, middle is off, and left is reverse. You will also find the headstock oil filler at the back.

For the low rpm, high torque applications, the gears are engaged by lifting the leaver up. When this leaver is engaged, beware!!! There is 3HP turning that spindle. A man can resist about 1/10th of a HP so it will easily tear your arm from it's socket if you are silly enough to use the machine with a ring or watch. When the cover is open you will also find the gearbox oil filler.

Colchester Chipmaster Continental Gearbox
The continental has a different gearbox arrangement than the imperial model. It features a joystick design with 6 different positions.


The joystick is the lever on the bottom right. The lever above it is for the carriage direction and the lever to the left above the oil sight glass is to allow more options for threads / feeds. There are a large number of threads available if you have the change wheels. I was lucky enough to have received a complete set with the machine.

The charts for feeds and threading have been included below:


I have found the arrangement of the controls to be quite intuitive and easy to understand. With the A, B, C lever, belt and gear head lever and the joystick, you have a combination of 44 threads and feed speeds available with the 28, 68 and 48 tooth change wheels.

Colchester Chipmaster Speed Wheel
The Chipmaster features a Kopp variator, a device that allows stepless speed changes on the fly. It is purely mechanical and is a marvellous invention really. Many Chipmaster has noisy variators because people didn't want to spend the extra time or money to either top up the oil, or purchase the right oil from the get-go.

Below you can see that the machine had the Swedish translation of "slow" and "fast" put on it from factory. Quite impressive really considering it was built in 64.


The speed wheel controls the variator via planetary wheels and by pulling the handle out while the machine is running and rotating left or right, the wheel will indicate what rpms you are running at. This system is very easy to use and is quite useful when you are whittling away a large diameter piece. As you reduce the diameter you can increase the rpm -  the same applies to parting stock.


Upon opening the door, it is evident that the machine features the newer variator and bracket. This is quite strange as the clutch lever is from the old design. The variator is NOT sealed. If you over fill it like I did, oil will pour out of the output shaft and onto your garage floor, hence the drip pan in the photo.

You can see that the variator bracket is isolated via rubber mounts and that the gearbox is belt driven from the variator. This combination greatly reduces vibration and improves the surface finish by a number of magnitude.

Colchester Chipmaster Change Gears and Clutch
The Chipmaster was made as a toolroom lathe. Despite the norm of tool room lathes weighing at least 1000 kg, this lathe had the rigidity and speed range to handle both heavy and delicate work. The change wheels allowed the machine's capability while keeping it's weight down as a comparable gearbox lathe able to do the same would push it's weight into the Monarch territory.

Upon opening the cover a micro switch cuts out the magnetic power switch. You quickly notice the Matrix clutch that allows you to engage and disengage the spindle - making metric threading possible.

This by the way, is a feature every serious hobby machinist needs to experience. Once you have used a lathe with a clutch, it is very hard to go back.

You will also notice in the above photo that there is a belt that allows the spindle to be run directly from a the clutch, which is run via 2 vee belts from the variator. For speeds over 350 rpm, the belt is engaged, while the gears are disengaged. This allows you to attain the extremely smooth finishes the Chipmaster is famous for.

From the end view you can also appreciate just how large the spindle diameter is.


Colchester Chipmaster Cabinet
The Chipmaster has some storage, but don't expect to be overwhelmed. The cabint at the front can be removed and actually allows easy access to key parts of the variator and motor.


Colchester Chipmaster Art Deco Design
Upon closing the gear cover, you are left with this view:


The Chipmaster may not be a Monarch, but it is a beautiful machine. If you have the chance to buy one that is not worn out, do it. I paid more than I wanted to but have not regretted it one bit. It is as functional as it is beautiful and really is a great machine to run. If you are looking for more info on oils, then look here:

Which oil for Colchester Chipmaster?

For information on the Chipmaster:

Chipmaster Info at Tony's Site

And now for one last picture...


BEAUTIFUL!!! Well that is the end of this novel. I hope you enjoyed it and if you are looking at buying a Chipmaster or are a fellow owner, drop me a line.

Stay safe.


The metal bandsaw - Macc Special 215 Horizontal Metal Bandsaw

I have been collecting metal and materials to use for a while now but was having issues cutting them to size. I bought a used Wurth bandsaw that was a little too small for what I wanted to cut. I kept contemplating a larger saw but couldn't bring myself to buy a Chinese machine. Since moving to Norway I have been trying my hardest to create a workshop of quality European machines and to buy Chinese at this point would be a bitter pill.

Patience is rewarded as I was checking a website similar to Craig's List in Norway called Finn and I came across an Italian made metal bandsaw, the Macc Special 215. The pictures in the add were quite bad but I Googled the name and came up with pictures of a fairly decent looking bandsaw. Macc seem to make industrial machines and seem to have a pretty good reputation. From the pictures I could see that it would need some repairs but given the 5000 NOK price tag ($850 USD), it was a fifth of the price when new. I told the seller I would take it.

The saw was quite filthy and I could see it needed a little TLC. The vice handle was missing and the electrical control box bracket was bent up. The blade tension handle was also broken and I could see the dried remains of the cutting / cooling fluid all over the saw. I could safely assume that the blade guide bearings would also need work as they would have had their share of metal filings and coolant in them. This was the state of the machine:


I added some wheels while I had it on it's side on the trailer so I could roll it around the workshop easier. Once I had it in the workshop I started to clean it up so I could see what needed attention.

The list of repairs to the Macc Special 215
  1. Guide bearings - one needed to be unseized and new bearings needed to be ordered
  2. Clean the grease out of the vice and use 68 weight hydraulic oil instead
  3. Remove rust and use a linseed rust preventer on metal surfaces
  4. Remove electrical box bracket, straighten and repaint
  5. Make new vice handle
I should probably have made a new blade tension handle but I figured I could wait for that since it still worked.

Making a new vice handle

The problem I had with making a new handle is that I didn't have an old handle to use as a guide. I have never seen this type of handle so it took a while to figure out how it should operate. I had some spare pieces of steel I had been saving so I used them since they had the right bends and the right dimensions. I also had a bolt I figured would make a decent handle.


This is what I had to work from:


I made the part on the end so that I could temporarily use it as a handle. It screws into the vice's lead screw and allows you to open or close the vice. I cut the material for the body of the handle to size with the saw and chucked it up in the lathe to true it both with regards to it's outside and inside diameter.


At this point it's worth mentioning how much I appreciate my little Colchester Chipmaster. I will be writing a review as I have what I believe to be one of the best small lathes ever made and have found it to be a fantastic machine for the hobby machinist.

Anyway, once I had turned the handle body to size, I milled a groove in order to recess the handle into the body. I drilled and tapped 3 holes - 1 to add a grub screw to tighten the handle on to the vice lead screw shank, and 2 to hold the arm onto the handle body. I also drilled a hole and counter bored it to fit an allen head screw that would fasten the handle to the lead screw.


I turned down the bolt and with 2 nuts I clamped it to the handle arm. We have had the communication technicians here laying fibre optic cables and they left some plastic conduit offcuts laying around. I used that for the rotating sleeve of the handle. It looks like a Franken-handle but it works very well and is one thing to cross off the list. Now the saw is perfectly functional, clean and has had all the bearings un-seized. My new bearings came in the mail today so I will change them all out this week. The finished result, a Happy Macc Special 215 horizontal metal bandsaw!


Now I'm off to play in the workshop! Take care.