Garage

Sunday, 27 March 2011

The planning stage of a trip

I try not to get too romantic about the notion of camping. I don't call it anything fancy, just good old camping. I also try not to get too fancy about what I bring, after all, the idea is to get away from all the hustle and bustle isn't it? So lets get started and work through the thought process when planning out the equipment needed for an overnight camp.

There are always some considerations when planning out a stay.
  • What is the season?
  • What is the weather forecast?
  • Will I be alone or are there others coming too?
  • How much activity am I planning on doing?
  • How isolated will I be?
  • What is the terrain like?
These are all important factors as they will dictate the equipment you will bring. If you will be with others, you can share the load and have 1 first aid kit for the group and one large tent instead of seperate tents... I am planning a trip for just myself in the late stages of Winter / early Spring in an area about 1 km from the nearest person. The weather forecast is good except it's predicted to dip to about -10 C in the night. So lets look at the gear.

Sleep System
I always put a great deal of thought into what sleeping gear to take. Since it will be so cold, I opted for a self inflating mattress, my winter bag /with a comfort rating of -18 C), my trusty pillow, bivy bag and poly sleeping bag liner. Everything but the sleeping bag and mattress is standard kit and accompanies regardless of season.


Food
I always like to take a little extra food when it's cold. This consists of a hearty meal for dinner (3 packets of noodles mixed with milk powder and cantarell soup), teabags, sugar, coffee, chocolate bars, porridge with raisins and powdered milk for breakfast and my thermos. I keep things simple and use a standard anodized aluminium 1 litre pot with a lid. Since there was loads of snow I didn't bother bringing water. All the food and the pot goes into a water proof bag to keep things dry and organised. I fill the thermos with water before I pack it. If I was to be going above the tree line, then I'd pack a stove too. I use a Coleman Feather 442 because it's robust and can be run on unleaded which is cheap.


I use a plastic spork made by Sea to Summit:

http://nl.wikipedia.org/wiki/Bestand:Sea_to_Summit_Spork.jpg

I highly recommend this spork as it has a good handle length and is tough. I have dummy chorded mine so I don't lose it and can hang it from a branch while I cook or wash up. I don't worry about a bowl as I eat straight from the pot and the cup I use is the thermos lid.

Miscelaneous
I always take a first aid kit. This kit is able to deal with splinters to major cuts and sprains. If you take an axe with you, consider beefing up your kit so that if you chop your leg, you can manage the injury. I also include pain killers and plastic bags so that a lost digit can be sealed and hopefully saved. I also have a personal hygeine kit. This has toilet paper, a tooth brush, bicarbonate of soda which can be used as tooth paste (plus a multitude of other things), matches, a lighter and a disposable poncho. I always take my headlamp too and check the batteries before each outing.


Cutting tools
People tend to go nuts when it comes to knives and axes. I don't really need a machete, folder, fixed blade, scalpel and Swiss Army knife, so I just carry 1 knife. It's a Scandinavian style knife I made that is small, light and sharp. I also take an axe and because it's cold, I take my 26" axe as it processes firewood much faster than a hatchet.

Camera
Last but not least I always take a camera and my mobile phone. My camera is just an old Cannon. I always check it has fresh batteries and suitable storage space on the SD card. I make sure my phone is charged too.


Clothing
Because it was going to be cold, layering was necessary. I had a poly T shirst, wool sweater and a jacket made of GX-2000 over the top. This was a warm, dry and wind proof combination. I wore poly longs and  teflon coated cotton pants. I also used my winter shoes which are water proof and have a woolen inner boot. I expected to have to walk through some snow so I wanted to be prepared. I also took wool socks and a woolen beanie.


When I pack my gear, I make sure that the heaviest items are in the small of my back, as close to my body as possible. This means that I am not going to feel "tippy" because of being top heavy or have to lean forward because everything is at the bottom of my pack. I also tighten up the compression straps to make sure everything is secure and the bag sits securely on my back. My first aid kit is always in my top pocket on the pack and I make sure it can be accessed with 1 hand. This is important, just ask this guy:

http://en.wikipedia.org/wiki/Aron_Ralston

People tend to like the latest and greatest back packs too. I am content with my Katmandu Interloper which is 75 +10. For some reason it didn't get great reviews but it is made from Cordura, is water resistant and very adjustable. I have taken mine around the world twice and it's seen some really rough treatment. In 8 years I have no complaints. They can be bought cheaply and in my practical experience, are a great pack.

Integral Designs South Col eVent bivy review / test

I have been researching and looking for a decent bivy for the last 2 years (at least). All the bivy bags that I have tried always suffered from terrible condensation where upon waking up in the middle of the night you were not sure if you had wet the bed. I have tried goretex, tegral tex and most other types of "tex" fabrics and none really impressed me. I have been hearing good things about eVent fabrics:

http://www.eventfabrics.com/eVent_technology.php

and as of yet have not come across a negative review on eVent bivy bags.

Why The Integral Designs South Col?
I am a minimalist at heart and don't dig all the bells and whistles of the more exotic bivy bags. I mean I like the idea of mosquito netting but poles, special vents etc.. just make me think of lost equipment and one muttering in the dark while trying to connect random poles into tiny sleeves. I have been there and tried that and for the most part, was not impressed. This is why I opted for the South Col bivy. Here are the specs:

  • Length = 92" (fits 6'7")
  • Width 32" (81cm) at the shoulders tapering to 22" (56cm) at the feet
  • Girth 69" (175 cm) at the shoulders tapering to 55" (140cm) at the feet
  • Weight 22Oz. (630 grams)
  • Packed size 15" X 3.5" (38cm X 9cm) in a SilCoat stuff sack
  • Lighweight eVent fabric on top, coated nylon floor
  • Wire stiffened hood
  • Seam taped
  • Right or left zip
  • RRP $260 USD
As you can tell it's a light little bivy. I ordered mine online and this is how it arrived:


The Nalgene is included for scale. It had minimal packaging (which I LOVE), and had a simple piece of information included.


Call me old fashioned but I don't dig all the marketing BS attatched to products now days. If I have bought it, then obviously I don't need anymore convincing right? I think Integral Designs (now to be referred to as ID) has nailed it with their packaging and lack of unnecessary marketing.

I weighed the item to see if it was indeed as light as advertised. The bivy plus stuff sack came in at 640 grams.


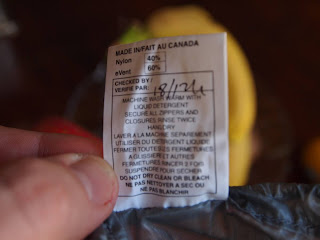
Next I checked the label to see if there were any important instructions.


I was impressed to see that each item was inspected before being packaged and that the South Col was made in Canada. I considered this a pleasant suprise as more production is moving to the far East each year. I opened the bag and dumped the bivy on the floor. I unrolled it to see exactly what I had bought as I hadn't actually seen one in the flesh.


I started to inspect the seams and zippers to check for any quality issues. Everything seemed to be of a high standard and quality.


The zipper pulls were constructed of fabric to reduce the weight and a spare was included in the bivy bag. The weather proof zippers were of high quality and all the stitching and seam sealing was very neat. I turned my attention to the inside of the bag and only found one thing that wasn't 100%. During storage and transit it appears that the eVent was rubbing on itself or a zipper and was a little worn.


This was no big deal as it can be repaired with a seam sealer like McNett Seam Grip if it shows any signs of leakage. Next I put in my self inflating mattress with my Winter sleeping bag. I climbed in to see how well everything fit and if there was any compression of the loft.


The fit was perfect. There is some extra room so you could store some clothes in the hood or the footbox. Getting in was ok as the length of the zipper is adequate. A little longer would have been better but then you would increase the weight of the bag and likelihood of leaking during rain. Packing the bivy away was straight forward and the stuff sack is roomy enough for everything to stow easily. Some manufacturers ship their products in bags that can only be used once because once the contents are taken out, you need Superman, a tube of lube and a crowbar to get everything back in.

Testing out a product in the living room is not very realistic so I decided to pack my things and give the bivy a proper trial. It was -3 C when I stated out and set up camp. I chose a spot in the woods that had some shelter provided by the trees. I cleared the ground of sharp twigs and sticks that could damage the bag.


During the night, the temperature dropped to -10 C which is prime condensation / ice territory for a bivy. It was so cold that when I couldn't get the zipper open on the bivy I didn't bother to climb out to fix it. It turned out that a cloth zipper pull had jambed the zipper but it required me to climb out of the warmth to clear it. In the morning there was a little condensation on my bag where my breath contacted the sleeping bag.


Because of this, there was some ice in the bivy but it was minimal.


I was stunned at how well the eVent allowed the humidity to escape. There was no ice further down in the bivy which is where all the other bags I had tried failed to impress me. I make a habit of always turning sleeping bags and bivy bags inside out and letting them dry out after use. I did this to the bivy and within about 20 minutes the dark colour of the floor heated the bag up enough to drive out the moisture, even though the temperature outside was -5 C.


Overall I was really impressed with Integral Designs South Col bivy. I believe the design, though minimalist, is perfect and the weight saving is worth the lack of mosquito netting and poles. The materials and workmanship are top notch and it functions as advertised. At last, a bivy that keeps you dry from the elements and from condensation.

Repairing chipped edges

In the old days, the file was an axe man's best friend. The job of repairing a chipped edge was a long one that required great patience for the result to be satisfactory. Many lacked this patience which is why we see so many old, chipped heads laying around in old wood sheds.

I was experimenting with my favourite axe and decided on changing the edge and bringing it down to an 18 - 19 degree chisel grind. At this point I will say that an engineer's protractor like the one pictured is a great idea for anyone wanting to modify axes. Without it you are guessing at best and may end up repeating mistakes that will cost you time and possibly money.


I was interested to see how it would go in the relatively soft conifers and birch trees here in Norway. The day I went out we had a cold snap and the temperature was -3 C when I started chopping wood and dropped to a further -10 C over night. I warmed the head however despite my best efforts, the edge chipped. The chips were not too bad, but I still wasn't pleased I had chipped my favourite axe.


When I returned home, I decided to make lemonade from lemons and put up a tutorial on how one can repair such mishaps.

The first step is to set up your grinding jig to an appropriate angle. I don't use anything fancy, just a belt grinder with a piece of angle clamped into place. My jig gave me 23 degrees which is a degree more than a racing axe. If you add the slight convexing during sharpening then this will end up at about 25 - 28 degrees at the very edge.


The next step is to carefully grind until the chips are gone. I do this by resting the poll on the angle and arcing the bit lightly over the grinding belt. The harder you push, the more it heats up so be careful not to overheat the metal. A file is safer but takes more time. I work both sides uniformly until the chips are gone and I am left with a wire edge.


In the above image you can still see the remnant of the worst chip. Towards the toe of the axe though you can see the formation of the wire edge. This is a good sign and means that I don't have to grind much more in that area. I try to preserve my axes and unecessary grinding shortens the bit and thus shortens the service life of the axe.

Now once you have ground the chips out, use the protractor to check the angle one final time. Mine looks ok.


Now you don't need many tools to fix an axe. I do most repairs with the belt grinder, vice grips, drill, clamps, buffing wheel, stripping wheel and diamond hone. I am also mindful of safety and include earplugs and safety glasses as standard equipment.


Now clamping the axe to a work bench, fasten the stripping wheel into the drill. Be mindful of the rotation of the drill and change it so that the wheel spins away from the edge rather than into it. This will avoid catching of the edge and the axe or drill being flung uncontrollably. Now make light passes so that the newly ground portion of the blade is blended into the old. Once this is done, you will only slightly notice the transition between the old and newly ground portions of the bit. Change the wheel to the buffing wheel and give it a final polish in the same manner.


Repeat the same procedure on the other side. You may notice the wire edge has disappeared in some areas. This is not a necessary part of the procedure as the final sharpen with the diamond stone / hone will take care of that. Take the axe and give it a final sharpen. Give each side light passes with the stone / hone and then slice some wood lightly with the edge. This will remove an remnant of the wire edge. Now youcan strop or use a ceramic hone on the edge. The final step is to work harden the edge. Find a solid piece of wood and give it some very light chops with the axe. I use about 10 chops, spacing them out along the length of the edge so every portion is hardened.


Now go and test the axe to make sure everything has come together. I do this by finding some seasoned wood or frozen wood. In this case it was some frozen beech. The axe threw lovely big chips.


This is the benefit to a properly profiled axe. Nice deep cuts and ejected wood. A close up of the cut and the final condition of the edge.


as you can see, no damage to the edge at all. The extra 5 degrees makes a HUGE difference in the edge strength and the final slight convexing of the edge helps a great deal too. My convexing is very slight and is only done to the first 1 - 1.5mm of the edge so is hard to see. I have my favourite axe back in fighting form.

Thursday, 24 March 2011

The axe as a status symbol

It's finally happened. The tool most people don't know how to use properly has become the status symbol of the yuppy. Now, folks who have never done any manual labor in their lives can hang an axe on the wall and look at it with fond admiration while bragging to their friends. All this for the low price of....

$445 USD

That's right. No it's not made of Optimus Prime's right bicep, nor was it used to wipe out all the dinasaurs. It's just an axe with a painted handle. Even though I'll be giving this farce more advertising, you need to see it to believe it.

http://www.basecampx.com/the-works/

I know my way around axes and could tell on sight that this was in fact a Tuatahi work axe, which can be bought at this particular point in time for $212 USD. So for a little paint on the handle and a brand name stamped into the wood, you pay a princely markup of $233 This to me is not only a scam, but it's BS marketing at it's absolute worst. Read this tripe and if you can understand what the heck he is writing about, please feel free to enlighten me...

"As mean as it gets. Our Heavyweight will step up and be an extension of your entire body if you know how to swing."

What does this even mean? So if someone stupid enough buys this axe and finds it less than orgasmic while swinging it around their apartment while sipping a martini, it's not the seller's fault as obviously the purchaser doesn't know how to swing an axe. If a person knows how to swing an axe chances are they won't be paying $445 dollars anyway and will stick to the old beaten Plumb axe their dad used.

Hold onto your hats, here comes a rant....

How did this all come about? Is nothing sacred anymore? First designers ripped off old worn and torn jeans which used to be earned legitimately by busting one's arse at work. Then it was the bed hair and after that the bicycle. All these used to be symbols representing the financially strapped and struggling who couldn't afford new jeans, posh haircuts and a car. Now they've grown tired of these and the marketing types have moved onto what was typically reserved for the real men. You know, those guys who didn't give a warm tin of tobacco spit about image and the "cool factor". They have stolen the axe.

Reading some of the dribble on this page has made me realise how carefully thought out the whole concept is. You see, you appeal to the urges that a man has to feel tough and masculine. You even offer him an experience, in this case it's a, and I quote:

"truly unique brand experience"

I am not sure what this is, but it sounds exciting. Then we talk about the code of being a man:

"There was also something else my father taught me in Algonquin Park…
A code.
The code of man. The principles which make a boy into “a man”. Qualities which engender respect and beget leadership. My father’s code was passed on to me around the campfire that was fueled by the wood hewn by our axes."

I mean really? I would be ASHAMED putting this kind of rubbish into writing. He even gives the axe a plug, like it really played some mystical role in his road to manhood. I'd bet my last tin of baked beans his dad didn't hack any trees down with a $445 yuppy axe (this will be shortened to yax in future). To make matters worse, this guy admits to founding the Best Made Co.

http://www.bestmadeco.com/

Which is another marketing company that simply re-badges other products and charges a ridiculous mark up. I work hard in trying to teach people how to resurrect old axes so that they can feel a sense of pride and accomplishment and possibly pass this skill to others. I do this so others can save money, learn a practical skill and understand what goes into making an axe. It stands to reason That I feel like I am at the opposite end of the spectrum to these types of companies and emotive advertising. You see, regardless of what the advertising tells you, it's just an axe. Yes, they use high quality axes, but, unless you practice using them you may as well have a $12 special taken from the bargain bin at your local hardware store. The price contradicts what the advertising is trying to sell you, because no-one in their right mind will spend that money on a tool that will get beaten and scratched in daily use.

The sad thing is, Tuatahi axes who make the Base Camp X axes make an excellent product that does not need the extra fluffing to sell itself. The axes have an excellent reputation amongst axe racers world wide and is often considered one of the best for the money in the world. So why do I care? Because I don't like the emotive and dishonest advertising used by those "middlemen" looking to rip people off. Do yourself a favour if you want a good axe and buy it straight from Tuatahi.

http://www.tuatahiaxes.com/

In fact, when you talk to Jo, tell her Paul from Norway sent you. I'll have my Tuatahi axe in a couple of weeks because I don't consider the modifications done by Base Camp X and Best Made add anything to Tuatahi axes at all. Stay posted for my review of the Tuatahi work axe and if you absolutely must spend money on something, feel free to send some my way.

Illuminating the camp with the Princeton Tec EOS

I don't know why it took me so long to change over to head lamps. I guess I am a bit old fashioned and just didn't see the point of them, thinking they were a gimmick more than anything else. I started to see their benefits while fixing flat tires at night and trying to set up camp while gagging on a torch held in my mouth. I decided it was time to try one out but wanted to be certain I was going with a practical alternative.

I am not really a brand name guy however I will always buy quality if given the choice. I hovered over web reviews of various headlamps for a while trying to see if anything caught my eye. You see, you need a torch that's reliable because when you need to use it, it's usually for something pretty important. This meant that it had to function in rain, sleet, snow and cold. That's right, I specifically said COLD. There are many headlamps that have seperate battery packs that you can put in your jacket to stop the batteries getting too cold and cutting out. I think this is too much fluffing about and decided that I needed a torch that could take lithium L92 batteries that are suited to cold weather. This means that the need for a seperate battery pack is reduundant and you have a smaller headlamp and lighter overall package. Enter the Princeton Tec EOS.


The Basics


The EOS is a ruggedly built headlamp. It's quite small and lightweight. The lense is frosted plastic and recessed so as to avoid scratches. It is a sealed unit and the manufacturer claims it is water resistant up to 1m under water. The on / off switch is encased in rubber and is quite stiff to operate so you won't be accidentaly turning this thing on. It comes in 2 different colours, black and orange. I chose orange because it makes it easier to find while in my back pack. As an ex-firefighter, I have had experience with sealed torches and lights as we needed to be sure they wouldn't ignite gasses in hazardous environments. This headlamp is rated for such use:


The adjustment of the light angle is via a plastic ratchet system which seems to work quite well. I have run with the headlamp and havn't found it to move under normal movement and jolts. The back can be taken off via undoing a grippy screw at the back either with fingers or a coin / screwdriver. Doing so reveals the battery compartment and the o ring sealing the inner workings.


As you can see it takes 3 AAA batteries. This headlamp as mentioned earlier is lithium compatible which is a huge plus since many are not and thus they have reduced flexability in cold working conditions.

The Technical Stuff

This headlamp boasts some nifty technical upgrades from a normal old headlamp. First of all, it has a Luxeon I LED. This is just a fancy name for an LED that gives great performance for minimal battery consumption. It also means that it is extremely impact resistant and anything short of a minataur wailing on it with a golf club will be survivable. Next, it has some fancy circuitry which regualtes the current. The 1 Watt LED won't flicker and will be kept at a constant brightness as long as possible rather than fade as the battery weakens. When the battery has reached such a weak state that the current regulating circuit can no longer sustain constant brightness it will dim. This is pretty helpful as other lights will simply cut out and you may be left with your pants down in the dark, wondering where you can safely put your foot down.

You have 3 brightness setting too. High, medium and low. There is also a safety mode which gives you a flashing light  The battery will last on high: 4.5 hrs, on medium: 9.5 hrs and on low, a staggering 44 hours. These ratings are considered as the time before the light begins to dim.

A comparable product to this headlamp would probably be the Petzl Tactikka range, although at the same price point no Petzl headlamps were Lithium compatible.

Final Impressions

I really like this headlamp. I have used mine over the last 2 years and am still on the first set of batteries. It has been very functional and reliable. Would I recommend this to a good friend? For sure. There is a newer model of the Princeton Tec EOS called the... EOS II (those chaps at marketing deserve a raise!) which has a stated burn time of 115 hrs. It does cost extra though so if your maximum is $33 (which is $6 cheaper than when I bought mine!), then the standard EOS is the light for you. This headlamp is proof that you don't need to spend a fortune to get a quality product.

Friday, 11 March 2011

All that sparkles isn't gold

Advice is free, often for a reason. It can often sound like it's professional and well founded, but in reality is dribbling from the mouth of someone with no clue. I had to accompany 16 school kids on a winter trip and it involvd some cross country skiing. I am pretty lousy at skiing having grown up in Australia. I mean, if hell froze over, it would still be too warm for skiis in Queensland. If you can't picture that, then imagine that this is the opposite to what I know:


Since I know nothing about skiing either, I sought the advice from those around me regarding which equipment I needed. I was told:
  1. cross country skis will do fine
  2. use second hand shoes, save your money
  3. you'll be ok, it's only 8km to the cabin
Now normally I would have the opportunity to test things out for myself, but, my son was ill so I didn't have a chance. This was my second mistake. The first was getting advice from people who really couldn't care less about wether I enjoyed the trip or not.

We began our trip at 10.00am and it was blowing a gale. The temperature was -6 celcius on the mountain however the wind-chill made it feel much colder. It began fine and I thought I was doing quite well. I had good ski poles too, which was a plus. That was, until they began collapsing on their own. I didn't have a screw driver to tighten the clamp so I trudged along without using the poles much as they couldn't support me at all. Luckily, one of the students had a canned drink so I used the ring pull to tighten the screws. Once this was fixed, I had to contend with the soft snow.


I am a fairly big guy. I weigh about 100kg and with my pack on that went up to 116 kg. The skiis I had require a track consisting of compressed snow, without which they are very unstable and difficult to use even for a seasoned skiier. I am not a seasoned skiier. It sucked. Badly. Falling is bad enough, but doing it with a pack in loose snow is worse still. My foot would roll, the ski would sink and I'd go over. this happened quite a few times. The fact was, I received bad advice because what I really needed was mountain skiis. They are wider and allow my foot to be closer to ground and are therefore much more stable. If I was to buy them, I would also need to buy a pair of shoes as the bindings are different to cross country skiis and shoes.

I was about half way, thanking God that I hadn't twisted an ankle or knee. I realised my shoes started to feel quite loose. On close inspection, my shoes had begun to crack. Snow was melting and running into my shoes. The leather of course stretched and I ended up with clown shoes for ski boots. there was no stability at all. I received these vintage ski shoes from my father-in-law who had the best of intentions, but unfortunately had not treated the leather shoes in 30 years. They were brand new but had seen 30 winter / summer cycles which had damaged the leather and the sealant's integrity.

Thank goodness for friends with snow scooters.

My friend drove me the last 2km to the cabin as my shoes and skiis were unusable.


I am active and enjoy physical pursuits. It's humbling when this kind of thing happens. I have not had much luck because the first time I tried skiing, the guide used the wrong wax and I ended up plowing the track with stalactites on the bottom of my skiis. This forced me to walk 7km as the skiis would not slide along the snow at all. I am not sure if this is natures way of telling me to stick to the temperate and desert climates that I am used to, or just to hold off until spring. I am no quitter but I tell you, I am no fan of raging in the frozen wastes when bad advice and poor equipment collide on the same timeline. One of the reasons I started this blog was to try give some information and advice that I have learned (often the hard way), that I know works. Of course my advice is free too, so you take your chances. The difference is though, I care enough about this information to post it on a blog instead of just mentioning it in passing.

Here is my advice to those just starting out in winter sports.
  1. Take your time and figure out what you need carefully. If the sport or activity is something you are sure you want to continue, spend money on it. Buy what you need and make sure it's decent quality. Your enjoyment, and most likely a small degree of sanity will hinge on the ability of your equipment to perform.
  2. Test your gear before you go.
  3. Be realistic about your skills. If you are unskilled or out of practice, have an escape plan and people who can help.
  4. Be careful who you get advice from. Bad advice can get you killed. If the advice is bad, remember that the return trip is always harder, therefore turn around early and make the journey home while you have the energy.
  5. Take plenty of food. It's amazing how a hot drink from a thermos and a couple of biscuits can lift your energy levels and spirits.
This list is not exhaustive, but it's what I will be following in the future. Stay safe.

Thursday, 3 March 2011

Having what you need rather than what you want

I have a problem. I am wired to fix things I see and try improve systems to run better. I have tried to work on it so that I can be blissfuly  ignorant, but have failed miserably at it. This way of thinking has lead me to pay very close attention to my kids, how we raise them and outside influences that will shape them as they grow.

It really is a war zone. There is a fight raging for the minds of people. This begins very early, because, as any political tyrant or marketing guru knows, if you can win the minds of children and the weak willed, you have a generation of zombies to fleece and command. This often equates to government sanctioned manipulation. Don't believe me? Turn on any kids TV channel and see how much advertising the kids get bombed with. We are against children working, yet we are more than happy to manipulate them in other ways to make our money from them. We prosecute and hunt paedophiles and righfully so, yet allow these kids to be sexualised and manipulated by marketing.

I believe it all comes down to sex. The sooner you can have children making adult decisions, the sooner you can start manipulating them. Giving people rights to choose as adults without the responsibility that adults have is a recipe for disaster. When young men and women are exposed to sexuality and sexual content, several things happen. Women begin to buy products to make men notice them. Men do the same. This covers everything from lip balm to turbo chargers on cars. Our whole economy seems to hinge on sexualising everything and marketing things in a way that will make you feel like you will be the envy of all your friends, and people will want you. The only problem is, these items have cycles. Every 2 - 4 months there is a new and better product out, so you need to keep up. This inability to keep pace with the marketing image causes all kinds of grief. Serious identity confusion is probably the biggest problem of them all.

Mum and Dad work. What we see on TV changes monthly, if not daily. We have nothing firm to take hold of to create our identity and feel familiar with. This is the environment that our kids are growing up in. At some point we as parents need to put the brakes on and realise we are rich because we have what we need, not necessarily what we want. I catch myself out from time to time chasing dreams in the illusion that I will make use of something I see advertised, when in reality I probably never will. I have even been fleeced a couple times by the advertising. I am starting to grow out of this as I get older and see the scam for what it is. I have decided to rebel.

I don't wear clothes with flashy brand labels. I will not advertise for companies. I encourage people to buy secondhand. If a product survives long enough to become second hand, it is a good product. I don't watch TV. I don't care about Dancing with the Biggest Fatty Idol. I don't need a new car. I will not borrow money to buy a new watch. I spend time with my wife and children outside instead of going to resteraunts and the cinema. I learn to do things myself rather than depend on others. I try to teach my children to see past the fasade and the sugar coating, trying to reveal the farce that lies beneath. I teach the importance of saying what you mean, and meaning what you say. I show my kids that a life without honor is hollow and makes you a coward, ready to sell yourslef and others to provide your lusts.

It's all about self control and saying no. We are taught that saying no to yourself is bad. How often do we hear this line, "I have worked hard all week - month - year... I deserve to...". Sometimes there is no justification for doing stupid things and catering to some desires. If we view our time, money and relationships as an investment, then we need to look at short term pleasure versus long term gain. We should view what we see around us in the same way. How will giving in to this desire / advertising / attitude better me or others around me. When I started thinking like this, I filtered out a great deal of garbage in my life and liberated a heap of time I would have spent watching TV, sitting at the pub, partying etc...

Being still and reflective is not the same as doing nothing. You don't have to be a rat on a wheel to get somewhere. Spend time in refelection and think about how your are investing yourself and what legacy you will leave behind. I think about this daily now that I have kids. I had practice doing this while working as a teacher as I always took this role seriously and saw my job as one of great importance. This is why the outdoors is great. No distractions, just you and your attitude. This is why wilderness therapy works so well. Distractions hide who we are, like the magician's lovely assistant distracts us so the magician can hide his secrets, our weak character traits hide behind the ipod and TV.

Focus on what you need, not what you want. You will be as suprised as I was at how little we actually need to be happy, and make others around us happier too.

How to reprofile axes and hatchets

Over the last several years, the number of threads on forums regarding axe and hatchet re-profiling have increased. Some of these contain useful info, most though talk about it, but never show how it's actually done. Even fewer still explain why it makes an axe cut better and how the profile differs between an axe for softwood, and an axe for hardwood. Changing the edge geometry of an axe is NOT reprofiling the axe. This is merely sharpening the axe. Anyone who tries to tell you differently is trying to sell a story to make themselves look more knowledgable than they actually are.

I initially became interested in reprofiling axes about 4 years ago. I had always been keen to learn this black art because as a child I had been to country fairs in Queensland where I witnessed axe racing. It is something special to see one of these axes slice through a large block of wood like butter. I was always impressed at the large chunks of wood these axes managed to throw and knew there was something special about them. When compared to a regular axe, they had a different shape, profile and were highly polished. I always knew this was no coincidence.

Why reprofile an axe?
It seems like an axe should be able to perform properly straight from the box right? I mean we don't need to reprofile knives. The truth is that most axe companies forge the heads, then look at the cheapest and easiest option. This usually involves leaving the bit of the axe thick. this is done so that the heat treat is easier and cheaper steel can be used. You see, the finer the edge, the more necessary quality steel and heat treat becomes. Axes need to be left reasonably thick at the bit because heat treating thin metal is very difficult. Once the heat treat is done, they should then be ground and polished so that the profile is correct, and the edge geometry is right. Unfortunately, to cut down on work all the smith does is put the edge on a belt grinder and gives it a very obtuse edge and then call it a "convex edge". At this point it would pay to look at the following diagram:


If you look where the cheeks are, these should also be hollowed out. If they are not, then the axe will bind due to friction when you try to take deep cuts. This is a tricky thing to do correctly though. When the bit initially cuts in, the wood compresses. As the bit continues to cut in, the wood ramps up on the wedge shape of the bit, then it reaches the cheeks. At this point the wood loses contact with axe, allowing the momentum of the axe to drive the bit in deeper without the wood slowing it at the cheeks. Wood is elastic to a point, and when it passes the union of the bit / cheeks, it decompresses slightly. When hollowing out the cheeks, you need to make sure you hollow it out enough so when the wood decompresses, it does not bind at the cheeks. The following rudimentary diagram illustrates the point:

This diagram is a top down view of an axe head. many start out like the axe on the left. After a reprofile, they look like the axe on the right. The transition between the cheeks and the eye MUST be smooth. If it isn't you will have binding occuring at this point when you try to split wood.

Difference between hardwood and softwood axes
There is a difference between axes meant for hardwood as opposed to softwood. Softwood is more "spongy" in a sense, so when you make your second cut, you need a wider blade to clear the cut and eject the chip of wood out. This does not mean thicker, but, from the edge to where the cheeks start will be a greater distance than on a hardwood axe. I typically make this distance anywhere up to 1 1/2" on axes used for birch or pine. If the blade is narrow, then the wood will simply compress and not split along the grain. This results in having to twist the axe in the wood to try clear the cut. Hardwoods are more brittle so you don't need such a broad "wedge" to cause the wood to crack and be ejected. On hardwoods I tend to leave about a 1/2" blade.

Lets reprofile an axe
So what tools do we need? Here is a list:

1) Angle grinder with grinding disk.
2) Flap disks ranging from 60 - 120 grit.
3) Drill with paint stripping wheel.
4) Bucket of water or snow. I prefer snow.
5) Sanding pads.
6) A belt grinder is preferrable but not absolutely necessary.
7) Quick clamps
8) Bastard file and tape
9) Ear and eye protection
10) Straight edge

Now lets see what we have to work with. As you can see it's a pretty standard Wetterlings axe. It has the forged finish and rough look to it. I hand selected this one as it had the least deformed and unbalanced head of the lot. This is not saying much for the quality control.


Once the axe is laid on the table and a straight edge is used, you soon see how bad the transition between the cheeks and the eye actually is.


What we need to do is thin down the bit so we have a chisel grind instead of an obtuse convex first. Then hollow out the cheeks, being mindful to blend them in to the eye and poll. Here is a side view where the dent from the smith's hammer is evident between the poll and cheeks.


This is where you even up each side of the blade. Manufacturers like to boast a "convex" edge. This is usually a rounded edge that has been convexed to hide the poor edge geometry and inconsistancy. We need to take away the very obtuse convex until we have a "scandi" grind. We can do this with files, or use a belt grinder. I have made a cheap and nasty rig for my grinder that the poll can rest on while the blade is ground flat.

If you use a file, you can set up your axe like in the following picture.
The tape will protect the poll as you draw file. If you have a belt grinder, you need to make a jig so that the poll is raised off the belt slightly so that you can grind the blade of the axe. I don't have a picture of this but I just use vice grips and a piece of angle iron on my grinder. Remember to cool the metal REGULARLY!!

Once you have the blade of the axe ground so that the convex edge is gone, you can assess how unbalanced the axe is. This is what I was left with.


As you can see, the top picture shows that there is much more meat on that cheek than on the other side. We need to make it symmetrical.

Now we move onto hollowing out the cheeks. The first step is to make bumpers to stop us running the angle grinder to close to the edge. I do this by finding a scrap piece of laminate.
Placing the edge onto the laminate, trace around the edge and then grind it out with the angle grinder or bench grinder.

Now clamp your axe to the bench using quick clamps. Measure a half inch from the edge and clamp the bumper onto the blade. Now with the angle grinder, carefully blend the poll with the cheeks. This stage is critical. Constantly check the progress and how much has been removed. You won't grind all the way up to the bumper, so 1/2" will translate to about an inch when it's done.

At this point it is very easy to overheat the head. Keep cooling it. Once one side looks good, go to the belt grinder or the paint stripping wheel on the drill. Starting from the poll, grind down to the edge to smooth out and polish out grind marks. REMEMBER, you will need to reverse the drill's spin depending on the edge you are grinding against. If you don't, it will grab and you will injure yourself. Once you have an even finish, inspect the axe in a good light.
Now one side has been blended, repeat the process on the other side.


This side looks good, now it's time to do the other. Keep checking that the work is symmetrical. Once done, give the head a final polish with the sanding blocks / pads. Give the edge a final sharpen, eliminating the wire edge you got from the grinder or files. You will be left with this:


As you can see, the profile looks much better and the transition from cheek to poll is smooth. The edge is also thinner, which will prevent deflection if you chop at shallower angles. The only recommendation now are that you put a very small convex or secondary bevel on the edge to prevent chipping. Also, work harden the edge before use by lightly chopping some wood after you have sharpened it. If cutting in cold weather, put the head under your jacket to warm it first before you start cutting otherwise you can also damage the edge. this is good practice with any axe, not just one that has been re-profiled. Any questions or comments are welcome.