I have had a MIG welder on my wish list for a long time. I can't justify buying one new since I am unsure how often I will use one. As anyone also following my blog knows, I really am not a fan of Chinese tools so that was a nail in the coffin as well.
I sold a dividing head and a rotary table a few weeks ago to a nice gent who mentioned he had some tools and equipment he was looking to get rid of. He mentioned some diamond cup wheels which would be perfect for my Thörns T2 tool and cutter grinder.
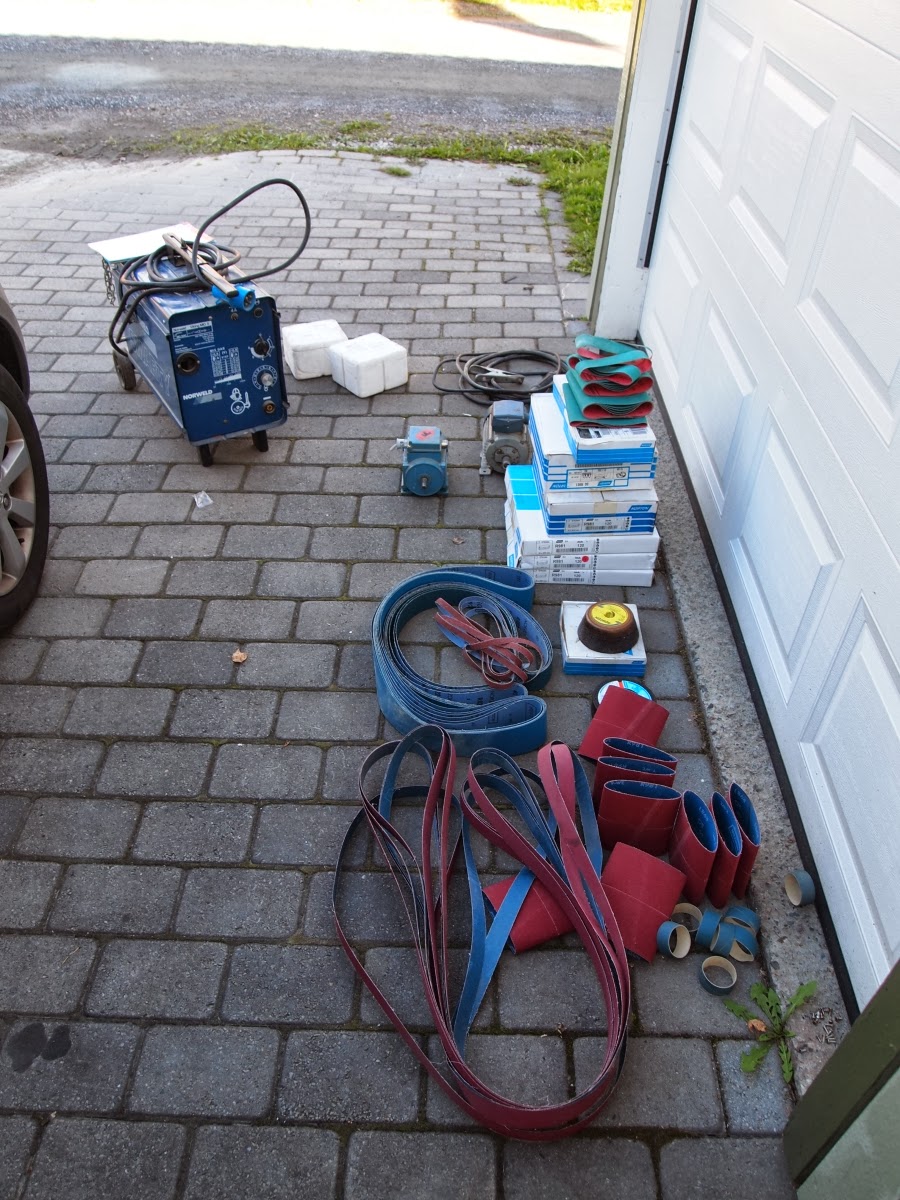
I stopped into his place today and walked away with this haul here:
I ended up with a heap of sandpaper, stainless grinding disks, 2 small 3 phase motors, 2 diamond grinding cups, a grinding wheel and a MIG welder. I bought more than I really needed but I couldn't pass up a Swedish made MIG welder:
It even came with the instruction books. I didn't buy the gas bottle since I will use gassless MIG welding wire. The diamond cup are really what I wanted and they will be ready to go when I have the grinder up and running:
So I'm a happy camper today. It's been a productive weekend!
Stay safe.
Showing posts with label Gear Talk. Show all posts
Sunday, 22 September 2013
Wednesday, 18 September 2013
The Horizontal Metal Bandsaw for the Hobby Machinist
I have a pretty decent collection of metal working machines now. I have a drill press,, metal mill, lathe, surface and tool grinder, belt grinder, bench grinder, drill bit grinder and a metal bandsaw. The metal bandsaw was the last machine I purchased and to be honest I don't know why I waited so long.
The truth about machining is that it is just a process of material removal. Anything that makes this process easier and allows you the ability of rapidly reducing the size of you material is a huge plus. Hacksaws and files do this in a manual fashion, the horizontal metal bandsaw, mill and lathe allow you to do this with higher speed while still maintaining precision.
The horizontal metal bandsaw opens up your options with regards to stock choice. For example you can cut an axle down and use the metal for your projects or just store the metal for a rainy day. You would not consider this if you had to cut the material by hand (believe me, I used to use a 6" grinder and a hacksaw). This is the reason why the Chinese / Taiwanese 4" x 6" metal bandsaw have skyrocketed in popularity. For the price these machines cost, I can't blame people for buying them - but I often wonder what the trade-off is in hours to get them to perform.
So what is it that you need to look for in a horizontal metal bandsaw for hobby use? I am no expert but this was my list:
The ability to move the armature to cut angles means the saw can be placed against a wall with the stock clamped and there is no need to move the saw. Saws that require you to move the stock need to moved from walls as the stock bumps into them when cutting angles.
The option to use coolant means extra life for your saw blades. You may choose not to use it, but if you are doing repeated cuts in a hard material, this option will really shine through in the cut quality and life of the blade.
A solid vice is a must-have feature in my books. A quick action vice is an even bigger bonus but many cheaper machines do not have this feature. A solid vice allows you to grip awkward shaped objects tightly and prevents the stock from rolling in the jaws and damaging your blade. This especially necessary if you have course toothed blades and a strong motor.
The powerful motor means you can cut through tough materials without bogging the saw down. It also allows the machine to run cooler and therefore extends the life of the machine. I have seen many photos of smoking metal bandsaws because the motor was cheap garbage with overly-generous horsepower ratings. Unfortunately, if you buy Asian you are often rolling the dice as to wether the ratings are true.
I know many people don't care too much about rigidity in a saw but for me this was important. The larger the capacity of the saw, the more rigid you want it. Rigidity allows you tension the saw blade enough to keep it tracking straight. With flimsy saws, the more you tighten, the more you alter the shape of the frame, making a square cut difficult to achieve. Woodworkers are more used to this issue with wood bandsaws but metal bandsaws also suffer from tracking issues if the saw is not rigid. Many saws provide you with a means of adjusting the blade guides which goes some way in fixing tracking issues, but these are no substitute for adjustability AND rigidity.
So are horizontal metal bandsaws with auto down-feed worth it? The answer is yes, providing the makers don't compromise on the other features I mentioned. When you are using a metal bandsaw for hobby use, it is not often that you will need to cut pieces of metal at the saw's maximum capacity. For my saw, I can cut a 50mm metal bar in about a minute. I don't believe that the auto feature will save me enough time to make up for other features that I would prefer to have. The other problem I see with automating certain functions is that people don't pay due care and attention to what is going on since they assume the machine will function properly 100% of the time. If by chance the blade starts tracking incorrectly due to low blade tension, then before you know it you have cut a slot into your vice because you were not present.
If you do decide to buy a horizontal metal bandsaw, do yourself a favour and buy a decent bi-metal blade. The blades that come with most machines (except for expensive European or Western machines) are garbage. The difference between a cheap blade and a quality blade are night and day. If I bought an Asian machine, the very first thing I would do before running it is to throw the unused cheap blade in the rubbish and install a decent blade by a reputable name like Starrett or Lenox. You should also keep a small oil bottle handy with cutting oil. This will make your bandsaw blades live a longer, happier life. Good luck bandsawing!
The truth about machining is that it is just a process of material removal. Anything that makes this process easier and allows you the ability of rapidly reducing the size of you material is a huge plus. Hacksaws and files do this in a manual fashion, the horizontal metal bandsaw, mill and lathe allow you to do this with higher speed while still maintaining precision.
The horizontal metal bandsaw opens up your options with regards to stock choice. For example you can cut an axle down and use the metal for your projects or just store the metal for a rainy day. You would not consider this if you had to cut the material by hand (believe me, I used to use a 6" grinder and a hacksaw). This is the reason why the Chinese / Taiwanese 4" x 6" metal bandsaw have skyrocketed in popularity. For the price these machines cost, I can't blame people for buying them - but I often wonder what the trade-off is in hours to get them to perform.
So what is it that you need to look for in a horizontal metal bandsaw for hobby use? I am no expert but this was my list:
- Useful capacity
- The ability to cut angles by moving the saw armature, not the stock
- Ability to use coolant
- A solid vice
- A powerful motor
- Rigidity
The ability to move the armature to cut angles means the saw can be placed against a wall with the stock clamped and there is no need to move the saw. Saws that require you to move the stock need to moved from walls as the stock bumps into them when cutting angles.
The option to use coolant means extra life for your saw blades. You may choose not to use it, but if you are doing repeated cuts in a hard material, this option will really shine through in the cut quality and life of the blade.
A solid vice is a must-have feature in my books. A quick action vice is an even bigger bonus but many cheaper machines do not have this feature. A solid vice allows you to grip awkward shaped objects tightly and prevents the stock from rolling in the jaws and damaging your blade. This especially necessary if you have course toothed blades and a strong motor.
The powerful motor means you can cut through tough materials without bogging the saw down. It also allows the machine to run cooler and therefore extends the life of the machine. I have seen many photos of smoking metal bandsaws because the motor was cheap garbage with overly-generous horsepower ratings. Unfortunately, if you buy Asian you are often rolling the dice as to wether the ratings are true.
I know many people don't care too much about rigidity in a saw but for me this was important. The larger the capacity of the saw, the more rigid you want it. Rigidity allows you tension the saw blade enough to keep it tracking straight. With flimsy saws, the more you tighten, the more you alter the shape of the frame, making a square cut difficult to achieve. Woodworkers are more used to this issue with wood bandsaws but metal bandsaws also suffer from tracking issues if the saw is not rigid. Many saws provide you with a means of adjusting the blade guides which goes some way in fixing tracking issues, but these are no substitute for adjustability AND rigidity.
So are horizontal metal bandsaws with auto down-feed worth it? The answer is yes, providing the makers don't compromise on the other features I mentioned. When you are using a metal bandsaw for hobby use, it is not often that you will need to cut pieces of metal at the saw's maximum capacity. For my saw, I can cut a 50mm metal bar in about a minute. I don't believe that the auto feature will save me enough time to make up for other features that I would prefer to have. The other problem I see with automating certain functions is that people don't pay due care and attention to what is going on since they assume the machine will function properly 100% of the time. If by chance the blade starts tracking incorrectly due to low blade tension, then before you know it you have cut a slot into your vice because you were not present.
If you do decide to buy a horizontal metal bandsaw, do yourself a favour and buy a decent bi-metal blade. The blades that come with most machines (except for expensive European or Western machines) are garbage. The difference between a cheap blade and a quality blade are night and day. If I bought an Asian machine, the very first thing I would do before running it is to throw the unused cheap blade in the rubbish and install a decent blade by a reputable name like Starrett or Lenox. You should also keep a small oil bottle handy with cutting oil. This will make your bandsaw blades live a longer, happier life. Good luck bandsawing!
Sunday, 15 September 2013
The metal bandsaw - Macc Special 215 Horizontal Metal Bandsaw
I have been collecting metal and materials to use for a while now but was having issues cutting them to size. I bought a used Wurth bandsaw that was a little too small for what I wanted to cut. I kept contemplating a larger saw but couldn't bring myself to buy a Chinese machine. Since moving to Norway I have been trying my hardest to create a workshop of quality European machines and to buy Chinese at this point would be a bitter pill.
Patience is rewarded as I was checking a website similar to Craig's List in Norway called Finn and I came across an Italian made metal bandsaw, the Macc Special 215. The pictures in the add were quite bad but I Googled the name and came up with pictures of a fairly decent looking bandsaw. Macc seem to make industrial machines and seem to have a pretty good reputation. From the pictures I could see that it would need some repairs but given the 5000 NOK price tag ($850 USD), it was a fifth of the price when new. I told the seller I would take it.
The saw was quite filthy and I could see it needed a little TLC. The vice handle was missing and the electrical control box bracket was bent up. The blade tension handle was also broken and I could see the dried remains of the cutting / cooling fluid all over the saw. I could safely assume that the blade guide bearings would also need work as they would have had their share of metal filings and coolant in them. This was the state of the machine:
I added some wheels while I had it on it's side on the trailer so I could roll it around the workshop easier. Once I had it in the workshop I started to clean it up so I could see what needed attention.
The list of repairs to the Macc Special 215
Making a new vice handle
The problem I had with making a new handle is that I didn't have an old handle to use as a guide. I have never seen this type of handle so it took a while to figure out how it should operate. I had some spare pieces of steel I had been saving so I used them since they had the right bends and the right dimensions. I also had a bolt I figured would make a decent handle.
This is what I had to work from:
I made the part on the end so that I could temporarily use it as a handle. It screws into the vice's lead screw and allows you to open or close the vice. I cut the material for the body of the handle to size with the saw and chucked it up in the lathe to true it both with regards to it's outside and inside diameter.
At this point it's worth mentioning how much I appreciate my little Colchester Chipmaster. I will be writing a review as I have what I believe to be one of the best small lathes ever made and have found it to be a fantastic machine for the hobby machinist.
Anyway, once I had turned the handle body to size, I milled a groove in order to recess the handle into the body. I drilled and tapped 3 holes - 1 to add a grub screw to tighten the handle on to the vice lead screw shank, and 2 to hold the arm onto the handle body. I also drilled a hole and counter bored it to fit an allen head screw that would fasten the handle to the lead screw.
I turned down the bolt and with 2 nuts I clamped it to the handle arm. We have had the communication technicians here laying fibre optic cables and they left some plastic conduit offcuts laying around. I used that for the rotating sleeve of the handle. It looks like a Franken-handle but it works very well and is one thing to cross off the list. Now the saw is perfectly functional, clean and has had all the bearings un-seized. My new bearings came in the mail today so I will change them all out this week. The finished result, a Happy Macc Special 215 horizontal metal bandsaw!
Now I'm off to play in the workshop! Take care.
Patience is rewarded as I was checking a website similar to Craig's List in Norway called Finn and I came across an Italian made metal bandsaw, the Macc Special 215. The pictures in the add were quite bad but I Googled the name and came up with pictures of a fairly decent looking bandsaw. Macc seem to make industrial machines and seem to have a pretty good reputation. From the pictures I could see that it would need some repairs but given the 5000 NOK price tag ($850 USD), it was a fifth of the price when new. I told the seller I would take it.
The saw was quite filthy and I could see it needed a little TLC. The vice handle was missing and the electrical control box bracket was bent up. The blade tension handle was also broken and I could see the dried remains of the cutting / cooling fluid all over the saw. I could safely assume that the blade guide bearings would also need work as they would have had their share of metal filings and coolant in them. This was the state of the machine:
The list of repairs to the Macc Special 215
- Guide bearings - one needed to be unseized and new bearings needed to be ordered
- Clean the grease out of the vice and use 68 weight hydraulic oil instead
- Remove rust and use a linseed rust preventer on metal surfaces
- Remove electrical box bracket, straighten and repaint
- Make new vice handle
Making a new vice handle
The problem I had with making a new handle is that I didn't have an old handle to use as a guide. I have never seen this type of handle so it took a while to figure out how it should operate. I had some spare pieces of steel I had been saving so I used them since they had the right bends and the right dimensions. I also had a bolt I figured would make a decent handle.
This is what I had to work from:
I made the part on the end so that I could temporarily use it as a handle. It screws into the vice's lead screw and allows you to open or close the vice. I cut the material for the body of the handle to size with the saw and chucked it up in the lathe to true it both with regards to it's outside and inside diameter.
At this point it's worth mentioning how much I appreciate my little Colchester Chipmaster. I will be writing a review as I have what I believe to be one of the best small lathes ever made and have found it to be a fantastic machine for the hobby machinist.
Anyway, once I had turned the handle body to size, I milled a groove in order to recess the handle into the body. I drilled and tapped 3 holes - 1 to add a grub screw to tighten the handle on to the vice lead screw shank, and 2 to hold the arm onto the handle body. I also drilled a hole and counter bored it to fit an allen head screw that would fasten the handle to the lead screw.
I turned down the bolt and with 2 nuts I clamped it to the handle arm. We have had the communication technicians here laying fibre optic cables and they left some plastic conduit offcuts laying around. I used that for the rotating sleeve of the handle. It looks like a Franken-handle but it works very well and is one thing to cross off the list. Now the saw is perfectly functional, clean and has had all the bearings un-seized. My new bearings came in the mail today so I will change them all out this week. The finished result, a Happy Macc Special 215 horizontal metal bandsaw!
Now I'm off to play in the workshop! Take care.
Sunday, 13 January 2013
Ikea Råskog Hazet Tool Trolley, AKA: Poor Man's Hazet Trolley
Don't Hate Me, I Just Don't Like Them
I buy a lot of my tools used and I have a couple of guys I mainly buy from. I had the opportunity to buy 2 Hazet Tool Trolleys ( the 166 C)for $100 each. I couldn't bring myself to do it. I respect Hazet as a toolk compnay, but to me these things felt flimsy and rickety. On close inspection, the nylon sleeves used to tighten the tolerances were cracked and even if replaced, it seemed like the trolley's main purpose was to fold easily rather than be sturdy.
I have been working on the rewiring of my Colchester Chipmaster lathe for a while now and a common source of annoyance is the lack of a rolling tool cart. All tools and wiring end up in a heap and it makes a frustrating job even worse. I was tempted to go back to my tool suppliers and pick up a Hazet but resisted the urge. Fortunately, a couple of weeks ago I came across this:
Ikea Råskog
I inspected it closely and found that it was powder coated steel and given the bump, shake and kick test, was much more sturdy than the Hazet Tool Trolley. For 360 Norwegian Kroner or 65 USD (in the US they are only $49.99) brand spankin' new, I grabbed one immediately.
Dimensions and Description of the Ikea Hazet Trolley
Width: 45 cm
Height: 78 cm
The Ikea Poor Man's Hazet Tool Trolley ; Performance
I guess a Picture is worth a thousand words so here are a few;
Now you may argue that this looks OK, but it's not able to fold up. That is correct, it won't pack down to a smaller size, but this is what makes it ideal for a person who will only be using this in their garage or workshop. I don't know many travelling mechanics and even fewer of the hobby variety. It's fixed design makes it rigid and very stable.
The casters and the shelves are held fast with bolts and bracekts. Even after loading it up, it ddn't feel rickety in the least.
From the pictures you can see that the bottom of the shelf is made from mesh. This makes cleaning a snap as you just blow the rubbish through the shelves. I use a magnetic dish for all my screws and small odds and ends. The tray is of an ideal size since it won't allow you to over-load it with too much and risk making it top heavy.
Tips for the Poor Man's Hazet Trolley
Positives
Given the combination of the positive points and the few negatives, the Ikea Råskog Hazet Trolley or Poor Man's Hazet Trolley is a viable substitute to the (IMHO) overpriced and slightly fragile Hazet Tool Trolley. Having used this in the last 2 weeks, I have taken little care of putting the spanners in gently and the powder coating has held up well. It's size and manouverability is ideal for a small hobby garage and it's usefullness is more than worth the small financial investment. I think this is one of the garage mechanic's best kept secrets and given Ikea's tendency to discontinue it's products after short runs, I would snap one up immediately if I could see a use for one. It will take you about a half hour to assemble if you follow the instructions, and despite their poor quality, the tools are provided for assembly. Just to stress how impressed I am, this is the IDEAL DIY TOOL TROLLEY!
If you get one based on this review, drop me a comment to let me know what you think.
I buy a lot of my tools used and I have a couple of guys I mainly buy from. I had the opportunity to buy 2 Hazet Tool Trolleys ( the 166 C)for $100 each. I couldn't bring myself to do it. I respect Hazet as a toolk compnay, but to me these things felt flimsy and rickety. On close inspection, the nylon sleeves used to tighten the tolerances were cracked and even if replaced, it seemed like the trolley's main purpose was to fold easily rather than be sturdy.
I have been working on the rewiring of my Colchester Chipmaster lathe for a while now and a common source of annoyance is the lack of a rolling tool cart. All tools and wiring end up in a heap and it makes a frustrating job even worse. I was tempted to go back to my tool suppliers and pick up a Hazet but resisted the urge. Fortunately, a couple of weeks ago I came across this:
Ikea Råskog
I inspected it closely and found that it was powder coated steel and given the bump, shake and kick test, was much more sturdy than the Hazet Tool Trolley. For 360 Norwegian Kroner or 65 USD (in the US they are only $49.99) brand spankin' new, I grabbed one immediately.
Dimensions and Description of the Ikea Hazet Trolley
Product dimensions
Length: 13 3/4 "
Width: 17 3/4 "
Height: 30 3/4 "
Length: 35 cmWidth: 17 3/4 "
Height: 30 3/4 "
Width: 45 cm
Height: 78 cm
Product description
Steel, Epoxy powder coatingThe Ikea Poor Man's Hazet Tool Trolley ; Performance
I guess a Picture is worth a thousand words so here are a few;
Now you may argue that this looks OK, but it's not able to fold up. That is correct, it won't pack down to a smaller size, but this is what makes it ideal for a person who will only be using this in their garage or workshop. I don't know many travelling mechanics and even fewer of the hobby variety. It's fixed design makes it rigid and very stable.
The casters and the shelves are held fast with bolts and bracekts. Even after loading it up, it ddn't feel rickety in the least.
From the pictures you can see that the bottom of the shelf is made from mesh. This makes cleaning a snap as you just blow the rubbish through the shelves. I use a magnetic dish for all my screws and small odds and ends. The tray is of an ideal size since it won't allow you to over-load it with too much and risk making it top heavy.
Tips for the Poor Man's Hazet Trolley
- If you are loading it up, place heavier items in the lower shelves to lower the centre of gravity
- The castors are not of the highest quality. If you get grit in the exposed castor bearings, some rinsing with kerosene and a light oil will return them to working order.
- If you require extra tool storgae, you can add a magnetic knife holder to the outside of the cart. This will allow you to stick commonly used tools to the outside making them easily accessable
Positives
- Price. It is seriously cheap
- Sturdy
- Materials. It is powder coated steel
- Practical. The high walls of the shelves mean spray cans won't topple out
- Easy to maintain. Powder coated steel and mesh means a blow out with compressed air and a wipe with a cloth and it's clean again
- Few moving parts. Unlike the Hazet Tool Trolley, there are few needed replacable parts. No nylon to crack and replace or chains to break
- Availability. You won't need to scour the earth to find one in new condition. Every Ikea has them in stock
- Exposed bearings on the casters can attract grit
- Ikea is less cool than Hazet
- No pinstripes or speed holes, plus, turquoise is not a manly colour
Given the combination of the positive points and the few negatives, the Ikea Råskog Hazet Trolley or Poor Man's Hazet Trolley is a viable substitute to the (IMHO) overpriced and slightly fragile Hazet Tool Trolley. Having used this in the last 2 weeks, I have taken little care of putting the spanners in gently and the powder coating has held up well. It's size and manouverability is ideal for a small hobby garage and it's usefullness is more than worth the small financial investment. I think this is one of the garage mechanic's best kept secrets and given Ikea's tendency to discontinue it's products after short runs, I would snap one up immediately if I could see a use for one. It will take you about a half hour to assemble if you follow the instructions, and despite their poor quality, the tools are provided for assembly. Just to stress how impressed I am, this is the IDEAL DIY TOOL TROLLEY!
If you get one based on this review, drop me a comment to let me know what you think.
Sunday, 12 June 2011
Samsung Galaxy Tab P1000
Since starting my new job, I have been confined to work, and the woods. I have no TV, and more importantly, no internet. Since I am also away from my family from Monday to Friday, I have very little social contact as work is very professional. I debated getting a laptop and dongle but that also meant I had to get a data plan which ran into a significant cost. I researched and came across the Samsung Galaxy Tab P1000 "smart phone".
For some strange reason, the USA didn't have the 3G variant as widely available as Europe. This feature makes the phone a useful substitute where a laptop would be too big. It enables you to to conect to the mobile network and access the internet, which was just the feature I wanted. I also liked the fact I could expand the memory using Micro SD cards. This meant that instead of being limited to the 16 gig on board memory, I could expand it to 48 gig by using a 32 gig Micro SD card. The European version also had bluetooth enabled whcih the wifi version found in the USA didn't.
Initial Impression
I am impressed with the Galaxy Tab. I heard complaints about the size but to me it isn't an issue. here it is in my hands so you have an idea of scale.
Functionality
The Galaxy Tab is not a PC. It does have many PC like functions but expecting PC performance from it is asking a little much from such a small package. What it does offer is flexability. You have the following:
Usability
If you have used an i-anything, you can handle the Galaxy Tab. It is intuitive and there is a great deal of info online about how to optimize it's performance and battery life. Like any smart phone, it's an energy hog. The screen gobbles power at high brightness setting so I have mine turned down low. I also have programs that constantly need updating turned off and also don't engage WiFi unless I am using it. This helps conserve the battery and most times I get 2 - 3 days before thinking to charge the Tab.
Like the ipad, the screen also orientates itself using a gyro which is handy. This feature can be locked as sometimes you want the orientation to remain fixed. The speed at which the screen orientates itself is not the fastest (about .3 - .5 of a second by my estimates), however it's sufficient.
Buttons are located on the side where the sim and memory slots are found
At the top of the Tab, you will find the headphone / handsfree jack. Here is a tip:
You need to push the jack into the port HARD. If you don't, it will not engage and you will think you have a faulty headset as you will have no sound.
When it comes to sound, the Tab does a decent job. I watch films on mine every day as I have no TV. The little stereo speakers at the bottom do a good job and have respectable audio clarity considering the constraints. The picture quality is good and games / films alike look good on the screen
The screen resolution is 1024 x 600 which is sufficient given the size of the screen. This makes viewing documents easy on the tab.
Must Have Accesories
I am not much of an accessory fan, but there are some things I consider a must. These are:
Case
I bought a Roocase for my Tab. they had gotten good reviews and were significantly cheaper than the over priced Samsung variant. They are made of decent quality leather and look smart while protecting your Tab.
From the photos you should be able to tell that the case is good quality. It is backed by a lifetime warranty which is a positive. The only thing is that electronics usually get outdated after a year so there is no way this will be worn out by then. So how does the Galaxy Tab fit? Quite well. It does not slide around and seems well protected and snug. My only gripe is that the cut out for the screen is a little off and the Tab does not sit centrally. Having worked with leather though, I know this is extremely difficult to acheive so I am slowly letting my OCD dendencies subside.
In Conclusion
The Samsung Galaxy Tab keeps me connected. I have been very impressed with it and after a month using it, I am still happy with it. I bought it late in the release stage and because of this, I beat the early rush premium price. I am not a nerd nor am I technophobe so this fits the bill for me. With the addition of a bluetooth keyboard, the Tab does everything I would normally do on a PC. I don't care much about Apple vs Samsung and am not a fan boy of any particular company. I simply try to buy what is reliable, practical and economic. The Galaxy Tab was all these things when I needed them and so far I have not been disappointed.
For some strange reason, the USA didn't have the 3G variant as widely available as Europe. This feature makes the phone a useful substitute where a laptop would be too big. It enables you to to conect to the mobile network and access the internet, which was just the feature I wanted. I also liked the fact I could expand the memory using Micro SD cards. This meant that instead of being limited to the 16 gig on board memory, I could expand it to 48 gig by using a 32 gig Micro SD card. The European version also had bluetooth enabled whcih the wifi version found in the USA didn't.
Initial Impression
I am impressed with the Galaxy Tab. I heard complaints about the size but to me it isn't an issue. here it is in my hands so you have an idea of scale.
Functionality
The Galaxy Tab is not a PC. It does have many PC like functions but expecting PC performance from it is asking a little much from such a small package. What it does offer is flexability. You have the following:
- portability
- expandable memory
- 3G and WiFi (at least with the European version)
- Bluetooth (again with the European version)
- Access to Android programs and apps
- speed test
- skype
- msn mercury
- scientific calculator
- measurement converter
- Opera web browser (which runs much better than the standard browser that is pre-installed)
Usability
If you have used an i-anything, you can handle the Galaxy Tab. It is intuitive and there is a great deal of info online about how to optimize it's performance and battery life. Like any smart phone, it's an energy hog. The screen gobbles power at high brightness setting so I have mine turned down low. I also have programs that constantly need updating turned off and also don't engage WiFi unless I am using it. This helps conserve the battery and most times I get 2 - 3 days before thinking to charge the Tab.
Like the ipad, the screen also orientates itself using a gyro which is handy. This feature can be locked as sometimes you want the orientation to remain fixed. The speed at which the screen orientates itself is not the fastest (about .3 - .5 of a second by my estimates), however it's sufficient.
Buttons are located on the side where the sim and memory slots are found
At the top of the Tab, you will find the headphone / handsfree jack. Here is a tip:
You need to push the jack into the port HARD. If you don't, it will not engage and you will think you have a faulty headset as you will have no sound.
When it comes to sound, the Tab does a decent job. I watch films on mine every day as I have no TV. The little stereo speakers at the bottom do a good job and have respectable audio clarity considering the constraints. The picture quality is good and games / films alike look good on the screen
The screen resolution is 1024 x 600 which is sufficient given the size of the screen. This makes viewing documents easy on the tab.
Must Have Accesories
I am not much of an accessory fan, but there are some things I consider a must. These are:
- screen protector
- case
- extra memory cards
- bluetooth earpiece
Case
I bought a Roocase for my Tab. they had gotten good reviews and were significantly cheaper than the over priced Samsung variant. They are made of decent quality leather and look smart while protecting your Tab.
From the photos you should be able to tell that the case is good quality. It is backed by a lifetime warranty which is a positive. The only thing is that electronics usually get outdated after a year so there is no way this will be worn out by then. So how does the Galaxy Tab fit? Quite well. It does not slide around and seems well protected and snug. My only gripe is that the cut out for the screen is a little off and the Tab does not sit centrally. Having worked with leather though, I know this is extremely difficult to acheive so I am slowly letting my OCD dendencies subside.
In Conclusion
The Samsung Galaxy Tab keeps me connected. I have been very impressed with it and after a month using it, I am still happy with it. I bought it late in the release stage and because of this, I beat the early rush premium price. I am not a nerd nor am I technophobe so this fits the bill for me. With the addition of a bluetooth keyboard, the Tab does everything I would normally do on a PC. I don't care much about Apple vs Samsung and am not a fan boy of any particular company. I simply try to buy what is reliable, practical and economic. The Galaxy Tab was all these things when I needed them and so far I have not been disappointed.
Saturday, 23 April 2011
Stove and Eating Utensils
I love titanium stuff. It's true. If you gave me a choice between aluminium and titanium, I would choose titanium every time. Of course that is only true if the items were the same price. I won't pay a premium just so I can shave a few grams off my cup. Titanium utensils and ultra light weight stoves have the cool factor that's for sure, but I am just a humble bush bum that does not have a limitless supply of cash. For this reason I try to be practical about my choice of cooking and eating tools and try squeeze out every drop of value I can. here's a look at what I use and can recommend.
The Stove
Coleman Feather 442 Review
I love this stove. I think it represents the ultimate value for money ideal. It is sturdy and well built, and given the choice of materials, it will take a beating before it needs any repairs.
Operation: All you need to do is unscrew the primer and pump it between 20 - 30 times. Be sure to hold your thumb over the hole. Screw the primer back in. Next, pour a little fuel over the bowl and light it. Wait until the fuel is nearly burnt off and slowly open the valve. The vapour will ignite and after 10 - 20 seconds you will be presented with a lovely blue flame.
Maintenance: Other than putting a few drops of oil to keep the primer cup moistened, there is little that needs doing. If you notice a drop in performance, you just have to wriggle the valve and a self cleaning nozzle will take care of the rest. This is as easy as it gets.
Why a Feather 442? I use a Trangia alcohol stove too and love it. Alcohol does have it's limitations though. At high altitudes it's a poor choice as it takes a great deal longer to burn properly and in the cold there is greatly reduced performance. This was the initial reason I bought the Coleman. Since it can be pressurised by hand, I can compensate for altitude and cold. Many people advocate the use of heating paste in the cold but I just use either a cotton ball with vaseline or just pour fuel over the bowl and light. That's the beauty of this stove. Easy to light and tough as nails. It has been used by military forces the world over and only recently has been replaced by the Whisper-lite series of stoves. Here is a youtube review i did of the stove:
http://www.youtube.com/watch?v=RLiDA-tB36k
The Cook Set
Like I said, I love titanium. I just don't love the cost. I have used aluminium cook sets most of my life and have found them to be light, robust and easy to repair. I prefer anodized sets as they are tougher. This is a cheapie set I bought here in Norway:
As you can see it has a frying pan and a pot and it is sold under the name Rast. I rarely take the frying pan but I guess it's nice to have the option. The pot itself holds 1.2 litres which I find ample for one and in a pinch it could hold enough for two. The set has plastic handles which requires some thought when using. I make a fire and just put the pot on the ground with the handles pointing away from the fire. I push it up to the fire so that the edge is up against the coals. There is a little hole in the lid so once it starts to boil I can see the steam hissing out. It's not fancy but then again, it doesn't have to be.
If you choose aluminium, just be sure to understand it's limits. Don't let the water boil out so that it sits empty on the fire. This is a sure-fire way to destroy the set. If used on the open fire (which I mostly cook on), it will take on creasote and blacken. Don't let this bother you too much. Once it gets thick enough it can be chipped off. just be sure to give it a rinse and put it in a storage sack before packing it or else all your other gear will be black.
Eating Utensils
I do most of my camping alone so I don't bother to take a plate or bowl with me. I just eat straight from the pot. This has several advantages.
Like most of my gear, I dummy chord mine so I can hang it to dry. It also makes organising your camp kitchen as easy as finding the nearest tree and hanging your things from it. In the Summer I use this cup a great deal however in the Winter I use the lid from my thermos.
Spork
I love my spork. Again, you can get titanium sporks and aluminium sporks. I chose a poly carbonate one. It's cheap and more importantly, won't burn your lip when eating hot foods. This particular example has the right mix of volume for soups, and handle length for stirring the pot. Mine is in bright orange because these little buggers are so easy to lose. It is made by Sea to Summit and is dirt cheap:
Cheaper than chips at $.75
I always have a spare too in case unexpected company shows up for meal times. Again, my personal spork is dummy chorded for obvious reasons.
Water Storage
In Australia water storage is a tricky business. The lack of water in the environment means that any water you plan on using has to be carried with you. In Norway this is not such a big deal. there is water everywhere and for the most part, it is safe to drink straight from the source since most is fresh snow melt. I use several methods to store liquids here in Norway.
In the Summer I mainly use the Platy bag from Cascade Designs. This little device weighs next to nothing and once empty, can be rolled up. It takes up little room in the back pack. I chose a 1litre bag because the abundance of streams and lakes means I don't need anything more. I like the sip lid version as it means I have no cap to lose and I can adjust the flow if I am using it to wash my hands.
How to fill: These bags can be tricky to fill so here is how I fill mine. After taking the lid off, I inflate it. By holding it on the seams, I can maintain it's shape as I dip into the water source. This is by far the most effective way of filling this bag that I have found.
BPA free: I am not a fan of cancer or dud reproductive organs. It's just something I can live without and as such, avoid products that contain BPA. If you don't know what that is, it's time to get educated:
BPA as birthcontrol
Nearly all plastics still leach synthetic hormones though so we still have a long way to go until we are safe. For this reason, I try avoid using plastic to store hot or acidic liquids (except for my fold-a-cup).
Nalgene Bottle
I like my Nalgene which is also BPA free. It's tough and holds a litre of liquid. It has been made nearly redundant by the Platy Bag however if I think my bag will get knocked around, I take the Nalgene instead. I know it can take the abuse without leaking.
Thermos
In Winter the Thermos is a must. Mine is a 750ml model which I bought cheap. I don't know what brand it is and to be honest it probably does not matter much. Most are now made in China and have pretty similar performance. My routine when I make camp in Winter is to start a fire ASAP and boil water. I fill my thermos with boiling water and 2 tea bags. While I make dinner and eat, the tea steeps. I mix a couple spoon fulls of sugar and enjoy. I'll drink the whole thing before bed to warm me up. While the fire is dying down, I boil some more water and refill the thermos. This is placed in my sleeping bag so I will have water to make coffe and porridge for breakfast.
So there you have it. This is what i use and it's about as simple as I have been able to get. None of it is fancy or expensive. It is functional and robust though and in all the time I have been using these items (roughly 3 - 4 years), I have not broke or damaged any of them. You don't need the fanciest or most expensive because after all, getting the warm tasty stuff into the mouth shouldn't be made more complex than it needs to be.
The Stove
Coleman Feather 442 Review
I love this stove. I think it represents the ultimate value for money ideal. It is sturdy and well built, and given the choice of materials, it will take a beating before it needs any repairs.
Operation: All you need to do is unscrew the primer and pump it between 20 - 30 times. Be sure to hold your thumb over the hole. Screw the primer back in. Next, pour a little fuel over the bowl and light it. Wait until the fuel is nearly burnt off and slowly open the valve. The vapour will ignite and after 10 - 20 seconds you will be presented with a lovely blue flame.
Maintenance: Other than putting a few drops of oil to keep the primer cup moistened, there is little that needs doing. If you notice a drop in performance, you just have to wriggle the valve and a self cleaning nozzle will take care of the rest. This is as easy as it gets.
Why a Feather 442? I use a Trangia alcohol stove too and love it. Alcohol does have it's limitations though. At high altitudes it's a poor choice as it takes a great deal longer to burn properly and in the cold there is greatly reduced performance. This was the initial reason I bought the Coleman. Since it can be pressurised by hand, I can compensate for altitude and cold. Many people advocate the use of heating paste in the cold but I just use either a cotton ball with vaseline or just pour fuel over the bowl and light. That's the beauty of this stove. Easy to light and tough as nails. It has been used by military forces the world over and only recently has been replaced by the Whisper-lite series of stoves. Here is a youtube review i did of the stove:
http://www.youtube.com/watch?v=RLiDA-tB36k
The Cook Set
Like I said, I love titanium. I just don't love the cost. I have used aluminium cook sets most of my life and have found them to be light, robust and easy to repair. I prefer anodized sets as they are tougher. This is a cheapie set I bought here in Norway:
As you can see it has a frying pan and a pot and it is sold under the name Rast. I rarely take the frying pan but I guess it's nice to have the option. The pot itself holds 1.2 litres which I find ample for one and in a pinch it could hold enough for two. The set has plastic handles which requires some thought when using. I make a fire and just put the pot on the ground with the handles pointing away from the fire. I push it up to the fire so that the edge is up against the coals. There is a little hole in the lid so once it starts to boil I can see the steam hissing out. It's not fancy but then again, it doesn't have to be.
If you choose aluminium, just be sure to understand it's limits. Don't let the water boil out so that it sits empty on the fire. This is a sure-fire way to destroy the set. If used on the open fire (which I mostly cook on), it will take on creasote and blacken. Don't let this bother you too much. Once it gets thick enough it can be chipped off. just be sure to give it a rinse and put it in a storage sack before packing it or else all your other gear will be black.
Eating Utensils
I do most of my camping alone so I don't bother to take a plate or bowl with me. I just eat straight from the pot. This has several advantages.
- Less washing up
- Less equipment to carry
- Easier to reheat food
Like most of my gear, I dummy chord mine so I can hang it to dry. It also makes organising your camp kitchen as easy as finding the nearest tree and hanging your things from it. In the Summer I use this cup a great deal however in the Winter I use the lid from my thermos.
Spork
I love my spork. Again, you can get titanium sporks and aluminium sporks. I chose a poly carbonate one. It's cheap and more importantly, won't burn your lip when eating hot foods. This particular example has the right mix of volume for soups, and handle length for stirring the pot. Mine is in bright orange because these little buggers are so easy to lose. It is made by Sea to Summit and is dirt cheap:
Cheaper than chips at $.75
I always have a spare too in case unexpected company shows up for meal times. Again, my personal spork is dummy chorded for obvious reasons.
Water Storage
In Australia water storage is a tricky business. The lack of water in the environment means that any water you plan on using has to be carried with you. In Norway this is not such a big deal. there is water everywhere and for the most part, it is safe to drink straight from the source since most is fresh snow melt. I use several methods to store liquids here in Norway.
In the Summer I mainly use the Platy bag from Cascade Designs. This little device weighs next to nothing and once empty, can be rolled up. It takes up little room in the back pack. I chose a 1litre bag because the abundance of streams and lakes means I don't need anything more. I like the sip lid version as it means I have no cap to lose and I can adjust the flow if I am using it to wash my hands.
How to fill: These bags can be tricky to fill so here is how I fill mine. After taking the lid off, I inflate it. By holding it on the seams, I can maintain it's shape as I dip into the water source. This is by far the most effective way of filling this bag that I have found.
BPA free: I am not a fan of cancer or dud reproductive organs. It's just something I can live without and as such, avoid products that contain BPA. If you don't know what that is, it's time to get educated:
BPA as birthcontrol
Nearly all plastics still leach synthetic hormones though so we still have a long way to go until we are safe. For this reason, I try avoid using plastic to store hot or acidic liquids (except for my fold-a-cup).
Nalgene Bottle
I like my Nalgene which is also BPA free. It's tough and holds a litre of liquid. It has been made nearly redundant by the Platy Bag however if I think my bag will get knocked around, I take the Nalgene instead. I know it can take the abuse without leaking.
Thermos
In Winter the Thermos is a must. Mine is a 750ml model which I bought cheap. I don't know what brand it is and to be honest it probably does not matter much. Most are now made in China and have pretty similar performance. My routine when I make camp in Winter is to start a fire ASAP and boil water. I fill my thermos with boiling water and 2 tea bags. While I make dinner and eat, the tea steeps. I mix a couple spoon fulls of sugar and enjoy. I'll drink the whole thing before bed to warm me up. While the fire is dying down, I boil some more water and refill the thermos. This is placed in my sleeping bag so I will have water to make coffe and porridge for breakfast.
So there you have it. This is what i use and it's about as simple as I have been able to get. None of it is fancy or expensive. It is functional and robust though and in all the time I have been using these items (roughly 3 - 4 years), I have not broke or damaged any of them. You don't need the fanciest or most expensive because after all, getting the warm tasty stuff into the mouth shouldn't be made more complex than it needs to be.
Wednesday, 2 March 2011
The sleep system
Folks generally like to rave about the newest knife or axe they are carrying with good reason too. These items are used often in our daily activities when out in the woods or camping and as such deserve some special attention. What I don't understand though, is why people don't often spend the same time, effort or money on their sleep system. Don't get me wrong, I love me a good knife. I have many good knives, most of which are sitting in the draw when I am out. Yet, I couldn't care less about wether my blade was forged in the fires of Mount Doom by elf warriors and the steel quenched in the blood of virgins if I have had a lousy nights sleep.
On average, we probably spend an hour or so with a knife in our hands when we are out camping with the family. This time increases if we are alone due to the uninterrupted time we can spend on carving or whittling projects. Although we could spend 3 - 4 hours with a knife, it is a rare day that we would spend 6 - 8 hours. We do however spend 6 - 8 hours most nights trying to get some shut eye. I enjoy my sleep and without it, I get irritable and lose patience. Apparently I inherited this trait from my grandfather. He needed a nap after work to avoid the risk of temper loss and sudden destruction of all things in his immediate vicinity. As such, I preach the importance of a good sleep system and understanding what we need and why. I'll start at ground level and work my way up. Lets begin with the mattress.
Mattress / Pad
The older you get, the more you tend to feel when laying on your back and side. There was a time I could have slept on broken glass and rusty nails, without waking up once. In recent years though, I wake up with a stiff neck and sore hip if I try sleeping without a pad or mattress between the sleeping bag and the ground. A couple years ago I bit the bullet and pulled the trigger on a self inflating mattress and was pleasantly suprised at the difference it made in my sleep. You have a choice of 3 basic types of mattress, inflating, self inflating or closed cell.
My summer setup is much lighter. You can get away with less insulation between your body and the ground and therefore can probably use an inflatable. In the spring or autumn I strongly recommend using caution and using a light self inflating rather than an inflatable. This is due to sudden changes in temperature and the risk of hypothermia. I would stress this even more if you are camping alone. Below is a picture of my summer / spring / autumn setup with the various pads I use. Nalgene is included for reference.
On the left is my CoTima self inflating mattress. This thing packs up very small and has light foam inside. It requires extra help to reinflate but is still better than an inflatable in cold weather. On the right, below the sleeping bag is my inflatable mattress. It is only slightly bigger than the nalgene and would have to be the most comfortable pad I own. It requires a decent set of lungs to inflate and is made from sil-nylon. It is slippery and is harder to stay on than a mechanical bull on speed, but even still on level ground in the summer, it's a great pad. The yellow sack below it is an inflatable pillow. Call me a wuss but I love having a pillow. The next photo shows the pads set up.
as you can see, the inflatable is much thicker and givers better cushioning. What it doesn't give is insulation. I took it out once in spring with my down bag, thinking it would be warm enough. That was a big mistake. I froze all night and vowed never to make the same mistake again.
When you compare the size of all the bags packed, it becomes apparent why you would buy a couple for the different seasons. Here they are packed and sitting on my main self inflating mattress. The self inflating they are sitting on rolls up to about 2/3 the diameter of the closed cell and weighs substancially more than all the others.
To close on the topic of mats and pads, I will say to get quality. These things are often made with plastic and as such, are not the types of items we need in landfills. By buying good quality, you get a longer service life and reduce the garbage we see filling the dumps. Now I'm no tree hugging hippy, but I do love to see companies who are responsible. That is why I can recommend these guys:
http://pacoutdoor.com/about/history
Just have a read and I'm sure you will agree that their products are well thought out. I have had no complaints with my inflatable that they made.
Sleeping Bags
Winter bags-
I use a synthetic winter bag, despite the weight penalty. Yes they weigh more and offer slightly less warmth, but, there are positives. Condensation does not freeze in the filling causing clumps of ice to form. They also don't lose as much insulation when crushed out between your body and the pad or mat, meaning you can get away with a thinner pad / mat combo. They also stay warmer than down when wet. This may not be such an issue in very dry snow, but if you fall through some ice and your gear gets wet, this could be a life saving factor. Now the setup shown above is much bulkier and heavier than my summer setup for obvious reasons. The following photo is just to give you an idea of the size difference between my winter bag and summer bag. I have thrown in a Nalgene for reference.
Now not all bags are made equal. Often the ratings of the bags are outrageously over stated, to the point of being dangerous. My winter bag has the following ratings:
You will notice it has a standard EN 13537. This is a rating most bags sold within the EU have to try keep things honest. Yes, it's not a perfect system, but it's better than dying of hypothermia. You can read more here:
http://en.wikipedia.org/wiki/EN_13537
My bag is filled with Thermolite Extra, which I havce found to be quite excellent. Insulating material varies in it's properties and quality so do your research and check reviews before lashing out and buying a bag. Also be aware that many companies use shills to talk their products up, so go with an item that has a lot of reviews from independant sources.
My summer bag-
I sometimes learn things the hard way. This bag was an impulse buy at a sale before I really knew what I was on about when it came to bags. It has duck down filling, which when compared to goose down is like comparing a drunk five year old on rollerskates to Mike Tyson in a boxing ring.
It has a fill power of 450, which is pretty useless when your talking down. It needs a good shaking to loft and therefore is not the kind of bag you can just roll out onto your mat and come back to sleep in. It also has generous ratings. I would not use this thing if the temperature got below 6 degrees C, and I am a warm sleeper. It packs up small though and has some well thought out features. It has a pocket inside the bags and also a good neck baffle / collar to reduce heatloss through pumping. It also zips up without snagging which is a big bonus. It has served me well but when I buy a new bag to replace it, I'll be much more careful.
Accessories
You probably noticed the condition of my gear. I look after my things and enjoy having gear that is in good shape. I use a bivy bag when out, even if sleeping in a tent. My bivy is not the completely waterproof type, but has cotton on top for breathability and PU coated nylon for the floor. This is only to keep my bag clean and tear free. I always use a liner too, to avoid oil destroying the lofting ability of the bag.
These items pack up small and are light. They also extend the life of your bag and add a little warmth to the system. I never go out overnight without them. I also never go out without my pillow. I have tried rolled up jackets, shoes, waterbottles etc... but have never had a decent nights sleep with them. I need a pillow and despite the ridicule, I am fresher in the mornings compared to my he-man counter parts who scoff at my girly pillow toting ways.
Care
Never leave your sleeping bag in it's stuff sack for long periods. This will destroy it's lofting ability and eventually you will have a bag that won't keep you warm. Also, after you get out of your bag in the morning, unzip it and hang it out. This is hard to do if it's raining but in good weather I make this a rule. This allows condensation to evaporate and disperses any smells that may have accumulated overnight (hey, maybe someone likes beans for dinner!). If you do have to wash your bag, be that down or synthetic, do so with a very mild detergent. To dry it, put it in a drier with a couple tennis balls to break up the insulation and leave it fluffy again. This may not work with some synthetic bags so always check the instructions.
I will add as a final note, be careful how close to a fire you sleep. sleeping bags can catch fire very easily and can be very difficult to get out of. This is not the way I would want to go so I always exercise caution. Well, I hope this article was interesting and possibly helpful. Now get out there and go camping!!
On average, we probably spend an hour or so with a knife in our hands when we are out camping with the family. This time increases if we are alone due to the uninterrupted time we can spend on carving or whittling projects. Although we could spend 3 - 4 hours with a knife, it is a rare day that we would spend 6 - 8 hours. We do however spend 6 - 8 hours most nights trying to get some shut eye. I enjoy my sleep and without it, I get irritable and lose patience. Apparently I inherited this trait from my grandfather. He needed a nap after work to avoid the risk of temper loss and sudden destruction of all things in his immediate vicinity. As such, I preach the importance of a good sleep system and understanding what we need and why. I'll start at ground level and work my way up. Lets begin with the mattress.
Mattress / Pad
The older you get, the more you tend to feel when laying on your back and side. There was a time I could have slept on broken glass and rusty nails, without waking up once. In recent years though, I wake up with a stiff neck and sore hip if I try sleeping without a pad or mattress between the sleeping bag and the ground. A couple years ago I bit the bullet and pulled the trigger on a self inflating mattress and was pleasantly suprised at the difference it made in my sleep. You have a choice of 3 basic types of mattress, inflating, self inflating or closed cell.
- Inflatable pads pack the smallest of the matts but in general are useless at insultaing. There are sleeping pads with seperate chambers that reduce heat loss but the best are inflatables filled with down or synthetic fiber. Be aware that if your mattress springs a leak, the insulating properties and comfort level will be severely reduced.
- Self inflating pads are more comfortable and often times roll up to be quite compact. They are good at insulating and reduce heatloss to the ground. They are more comfortable than a closed cell pad and often times roll up to be quite compact. They are good at insulating and reduce heatloss to the ground.
- Closed cell foam pads are the middle ground. Less comfortable than the other 2 mattress types, they are the most robust. They are also quite good at insulating and on a positive note are cheap. These make a useful backup and are often times used with self inflating pads as a security measure in case of leaks.
My summer setup is much lighter. You can get away with less insulation between your body and the ground and therefore can probably use an inflatable. In the spring or autumn I strongly recommend using caution and using a light self inflating rather than an inflatable. This is due to sudden changes in temperature and the risk of hypothermia. I would stress this even more if you are camping alone. Below is a picture of my summer / spring / autumn setup with the various pads I use. Nalgene is included for reference.
On the left is my CoTima self inflating mattress. This thing packs up very small and has light foam inside. It requires extra help to reinflate but is still better than an inflatable in cold weather. On the right, below the sleeping bag is my inflatable mattress. It is only slightly bigger than the nalgene and would have to be the most comfortable pad I own. It requires a decent set of lungs to inflate and is made from sil-nylon. It is slippery and is harder to stay on than a mechanical bull on speed, but even still on level ground in the summer, it's a great pad. The yellow sack below it is an inflatable pillow. Call me a wuss but I love having a pillow. The next photo shows the pads set up.
as you can see, the inflatable is much thicker and givers better cushioning. What it doesn't give is insulation. I took it out once in spring with my down bag, thinking it would be warm enough. That was a big mistake. I froze all night and vowed never to make the same mistake again.
When you compare the size of all the bags packed, it becomes apparent why you would buy a couple for the different seasons. Here they are packed and sitting on my main self inflating mattress. The self inflating they are sitting on rolls up to about 2/3 the diameter of the closed cell and weighs substancially more than all the others.
To close on the topic of mats and pads, I will say to get quality. These things are often made with plastic and as such, are not the types of items we need in landfills. By buying good quality, you get a longer service life and reduce the garbage we see filling the dumps. Now I'm no tree hugging hippy, but I do love to see companies who are responsible. That is why I can recommend these guys:
http://pacoutdoor.com/about/history
Just have a read and I'm sure you will agree that their products are well thought out. I have had no complaints with my inflatable that they made.
Sleeping Bags
Winter bags-
I use a synthetic winter bag, despite the weight penalty. Yes they weigh more and offer slightly less warmth, but, there are positives. Condensation does not freeze in the filling causing clumps of ice to form. They also don't lose as much insulation when crushed out between your body and the pad or mat, meaning you can get away with a thinner pad / mat combo. They also stay warmer than down when wet. This may not be such an issue in very dry snow, but if you fall through some ice and your gear gets wet, this could be a life saving factor. Now the setup shown above is much bulkier and heavier than my summer setup for obvious reasons. The following photo is just to give you an idea of the size difference between my winter bag and summer bag. I have thrown in a Nalgene for reference.
Now not all bags are made equal. Often the ratings of the bags are outrageously over stated, to the point of being dangerous. My winter bag has the following ratings:
You will notice it has a standard EN 13537. This is a rating most bags sold within the EU have to try keep things honest. Yes, it's not a perfect system, but it's better than dying of hypothermia. You can read more here:
http://en.wikipedia.org/wiki/EN_13537
My bag is filled with Thermolite Extra, which I havce found to be quite excellent. Insulating material varies in it's properties and quality so do your research and check reviews before lashing out and buying a bag. Also be aware that many companies use shills to talk their products up, so go with an item that has a lot of reviews from independant sources.
My summer bag-
I sometimes learn things the hard way. This bag was an impulse buy at a sale before I really knew what I was on about when it came to bags. It has duck down filling, which when compared to goose down is like comparing a drunk five year old on rollerskates to Mike Tyson in a boxing ring.
It has a fill power of 450, which is pretty useless when your talking down. It needs a good shaking to loft and therefore is not the kind of bag you can just roll out onto your mat and come back to sleep in. It also has generous ratings. I would not use this thing if the temperature got below 6 degrees C, and I am a warm sleeper. It packs up small though and has some well thought out features. It has a pocket inside the bags and also a good neck baffle / collar to reduce heatloss through pumping. It also zips up without snagging which is a big bonus. It has served me well but when I buy a new bag to replace it, I'll be much more careful.
Accessories
You probably noticed the condition of my gear. I look after my things and enjoy having gear that is in good shape. I use a bivy bag when out, even if sleeping in a tent. My bivy is not the completely waterproof type, but has cotton on top for breathability and PU coated nylon for the floor. This is only to keep my bag clean and tear free. I always use a liner too, to avoid oil destroying the lofting ability of the bag.
These items pack up small and are light. They also extend the life of your bag and add a little warmth to the system. I never go out overnight without them. I also never go out without my pillow. I have tried rolled up jackets, shoes, waterbottles etc... but have never had a decent nights sleep with them. I need a pillow and despite the ridicule, I am fresher in the mornings compared to my he-man counter parts who scoff at my girly pillow toting ways.
Care
Never leave your sleeping bag in it's stuff sack for long periods. This will destroy it's lofting ability and eventually you will have a bag that won't keep you warm. Also, after you get out of your bag in the morning, unzip it and hang it out. This is hard to do if it's raining but in good weather I make this a rule. This allows condensation to evaporate and disperses any smells that may have accumulated overnight (hey, maybe someone likes beans for dinner!). If you do have to wash your bag, be that down or synthetic, do so with a very mild detergent. To dry it, put it in a drier with a couple tennis balls to break up the insulation and leave it fluffy again. This may not work with some synthetic bags so always check the instructions.
I will add as a final note, be careful how close to a fire you sleep. sleeping bags can catch fire very easily and can be very difficult to get out of. This is not the way I would want to go so I always exercise caution. Well, I hope this article was interesting and possibly helpful. Now get out there and go camping!!
Subscribe to:
Posts (Atom)

